Minimalist sunset by Andrew Dacey

This was an older experiment from my holiday in Corfu a few years ago. At the time, I was playing around with the idea of minimalism in photography. It's sat on my hard drive since then, and today I revisited it as part of my exercise of exploring my Lightroom catalogue more.

I like that this image has a bit of a sense of space, and some detail rather than simply being a picture of the clouds, but I'm still not 100% sure that this was a completely successful image.

Budapest sunset by Andrew Dacey

Budapest palace and the Chain Bridge

I've not been shooting anything since my trip to Florence, which has been making it a bit of a challenge to keep this page updated with new content. I'm trying to make an effort to post something three times a week now. What this is doing though is pushing me to revisit my older images. I'm trying not just to do new edits of images I've previously shared, but instead to find other images worth exploring that I've not shared before.

This image is from another work trip, this time to Budapest last November. We got this fantastic sunset while walking along the river and I took several shots across the bank. I've pushed this one quite far in Luminar, but I'm pleased with the overall look. As I've mentioned quite a bit recently, I'm finding my style is evolving to be more comfortable with quite heavy, even aggressively, edited images right now. I'm getting a good feel for when this will work though, it's certainly not a case where it will work for every image, and I also want to be clear that I'm not trying to suggest that any amount of editing will save a bad image. I'm quite particular about the images I chose to edit, and if the image is in boring harsh midday light, there's not any amount of boosting saturation that's going to help that. Not saying harsh light can't work for an image, just that most of my stuff taken in that kind of light tends not to be worth the effort.

New Black and White workflow by Andrew Dacey

Florence side street in the rain

I've wanted to sort out a new black and white workflow for some time now. I fell in love with Silver Efex Pro 2 from Nik Software, and that's been my go-to black and white tool for several years. Unfortunately, it's not been updated for some time, and while I love the conversions, it creates they aren't without problems. One of the things I've noted is that I get random artefacts in the corner at times. Usually, this is a one-time problem that's easily fixed by re-opening the smart object and closing it again, but it's annoying.

One of the things I liked about Silver Efex Pro was that the structure sliders were fantastic for pulling out detail. Because of that, I'd usually keep my images fairly flat and add the drama in Silver Efex. I'd tried other tools and found that I just couldn't get the same kind of look.

With working in Luminar, I've been falling in love with the detail extractor, and there is also a black and white conversion filter. I was wondering if I could adjust my workflow to do a more dramatic edit in Luminar and then adding the black and white conversion at the end. I'm still getting used to this workflow, but I'm starting to be happier with the results that I'm seeing. It's a different workflow than I'm used to with regards to having to work on the colour image a lot more before I apply the black and white conversion, but it does seem to be working for me.

Florence is full of these wonderful narrow side streets. I took a lot of shots of them, but I'm not very happy with most of them. I've realised that the best ones do need to have a person in them to provide some extra interest.

Hong Kong at night by Andrew Dacey

Mong Kok, Hong Kong at night

I wanted to mix things up a bit and post something completely different. I'd shared a few images on Instagram from my work trip to Hong Kong, and added some to my portfolio, but otherwise, haven't shared much from that trip. It was predominantly a work trip, and not a photography holiday, but I did try to shoot when I could.

I love shooting at night, especially with mixed lighting situations like this. You can get such exciting colour casts and play with how the white balance will remove, or accentuate these. Especially in this case where there were coloured lights in the shot, there's no "right" colour balance here. I love the cool-warm mix that the different lighting is giving this image.

This building was across the street from my hotel, and I had a view of it from my window, so I knew that it was an interesting building that could look neat from the right angle. I found a rooftop balcony attached to the building and was able to set up this shot from there. Rain clouds were coming in that night which show up with the light pollution from the city which adds some detail to the sky rather than just going pitch black.

Re-exploring my Peggy's Cove shot by Andrew Dacey

As part of my explorations of Luminar, I wanted to take another look at my Peggy's Cove shot from earlier in the year. I'd shared my previous editing steps for that shot on this blog already, and it was the start of a move to a more heavily post-processed style that I seem to be moving toward with my Florence shots and using Luminar. I'm pleased with these results, and I feel like it's an evolution of my style.

For the Peggy's Cove shot, I'd originally edited the photo in Lightroom, touched it up in Photoshop for removing some of the garbage in the water, and then finally applied a dramatic effect using Macphun's Intensify. Because of the heavier edit, as well as using another Macphun product I thought it would be interesting to see how I would approach things today in Luminar.

It's important to note that I deliberately don't look at the old image while I'm working on a re-edit. As much as this exercise is an exploration of a new tool, I'm also using it as an opportunity to let my style change and to see how I chose to process the images today. I have a memory of what the original edit looked like, but otherwise, try to approach things from the perspective of what do I feel the image needs, and where do I want to take it? What this means is that my comparisons are deliberately meant not to be as close a match as possible. While that might be interesting if you wanted to pixel peep, for me it's far more about how is my style changing and how using a different tool can influence the results.

I've mentioned before that I feel like editing images in Luminar creates a more organic workflow for me. What I mean by that is that Luminar has certain tools at hand that Lightroom doesn't. Similarly, there are some tools that Lightroom has, or work differently than Luminar. What this does for me is it presents me with opportunities that I might not have thought to explore otherwise. If I'm in Lightroom and want to apply effects, then I need to open Photoshop or another external editor. If I've already opened the image in Luminar, then I've already crossed that hurdle, so then having a filter like image radiance is right in front of me. Similarly, even in Photoshop, I have to think to use a plug-in or how to achieve the effect with other tools. I don't want to say that Luminar is a "better" tool, but by having some of these options immediately at hand, it's leading me in new directions that I might not have explored.

In the case of the Peggy's Cove image, I've taken it in a very different direction. The tones are very different, and I've gone for a softer approach to the sky and water, whereas in the original I went for a sharper approach. The one area I would explicitly call better is the details of the buildings and rocks. I pushed those quite far in the earlier edit, with multiple stages applying sharpening, and the fine details fall apart a bit when you zoom into 100%, whereas in the Luminar edit I feel that I've achieved a similar appearance of fine details without the artefacts at close examination.

Florence Pano by Andrew Dacey

The final panorama image edited in Luminar. I actually had to reduce the size of the image in order to upload it.

I wanted to test out Luminar with the big pano to see how it performs with a much larger image. In this case, a panoramic image that's over 97 megapixels. I figured that would be a really solid test of Luminar, pushing it far beyond what I've done previously with my 16mp images from my Fuji X-T1.

I took this image as a stitch of 12 portrait-orientation images with my 90mm f/2 lens. I had the camera locked down on a tripod so the pano was pretty easy to create and there were no problems with stitching it together. It's shown the quality of the 90mm lens; you can see how many people are standing at the top of the Duomo when you zoom into 100%.

This was a fairly simple edit in Luminar, employing most of the methods I'd been using in previous images. I'm not going to bother with a Lightroom vs Luminar comparison for this image. I feel the Luminar version is stronger, and that's becoming a consistent theme with these comparisons, and given the size of this pano, I'm not sure there's much point in posting the Lightroom version. It's worth noting that Luminar doesn't have any tools for pano stitching, so what I've done in this case is taken the merged DNG file that Lightroom created and used that as the original for this edit. I've also been able to confirm that even when using Luminar as an external editor from Lightroom in this manner that you can still save out the lmnr file from Luminar as well, so you can preserve the non-destructive edits in Luminar as part of a Lightroom to Luminar workflow.

Similar to previous edits, I did sync the final edited version's settings with the Lightroom copy to get the crop the same. In this case, I also used the spot healing tool in Lightroom to clean up the spots in the final image. It's one area where I'm not as happy with Luminar; there are retouching tools in the program, but it creates a processed version of the image on a new layer, so it's not the same kind of non-destructive workflow that you get in Lightroom. Worse, I've also found that the quality of the healing doesn't seem as good. Lightroom is pretty good at filling in the spots seamlessly, and if I need more robust corrections, then Photoshop's content-aware fill is amazing. Sadly, Luminar lacks in this aspect, even when dealing with simple spots that would clean up in Lightroom without issue I'm noticing that Luminar's healing brush leaves a more noticeable trace. Because of this, I expect to modify my workflow so that I do any clean up of spots at the very end in either Lightroom or Photoshop. It's a minor issue and not one that's enough to deter me from using Luminar for my editing.

Further Luminar Comparisons: Ponte Vecchio by Andrew Dacey

My quick edit using only Lightroom

I've been spending more time working with Luminar and working out a workflow that works for me. My recent trip to Florence has provided a lot of new images for me to process as it is, and while I processed several of them fairly quickly on my laptop while travelling, I'm finding that several of them are worth a second look and more considered processing effort.

The Luminar version of the same image, and admittedly more editing time to consider the image.

This time I've tried doing a roundtrip from Lightroom to Luminar. In the past, I was just using Lightroom to show me the raw file in Finder to open it directly in Luminar. The advantage of that approach was that I could save out the lmnr file to maintain the non-destructive nature of my edits. The downside was then the finished result didn't get added back into my library. It's not a significant concern at the moment, but I think the roundtrip workflow is much better if you want to keep using Lightroom as your catalogue. Unfortunately, I neglected to check if I can still save out the lmnr file while utilising the roundtrip workflow. I do like that you can choose to either edit the original file (in my case, the raw file) in Luminar or export with the Lightroom adjustments. This gives you some great flexibility if you want to use Luminar as your raw processor or just for effects.

The thing I'm enjoying with Luminar is that the workflow is very organic and you can trim things back to just the tools you need for the image. I'm starting to get a feel for what some of my "go to" filters are and am formulating some thoughts around setting up a starting place preset, but for now I'm starting with each image from scratch. There are options to save workspaces that present you with several filters loaded in right away, but I found that a little overwhelming at first. Starting with just the raw file and the raw develop filter is a basic starting point. What I then do is look at what I feel the image needs after that development. Given my style at the moment, that's usually saturation and vibrance along with the detail extractor filter, which is quickly becoming a favourite of mine. In this case, I used a brush to apply it only to the buildings and the bridge, but not the sky and the water. I also used the golden hour filter to add some extra warmth. I was a bit surprised at how well golden hour worked for this image since I took it after sunset during the blue hour, but I think it helped with the look and I'll try it out on other images in the future.

After that, I can move on to thinking about the direction that I want to take the image. In this case, I suspected the image radiance and Orton effect filters would enhance the glow of the streetlights and the reflection in the water. Where I didn't have perfectly smooth water in this shot, I didn't mind letting the reflection go blurrier. I tried the fog filter to see if that would also help out but wasn't happy with the effect on this particular image.

Finally, I used the exposure filter to darken the sky, which I applied with a gradient mask, brushing out the effect at the tops of the buildings. Normally in Lightroom, that would be something I'd do much earlier in the development process. My traditional workflow has been raw development, local adjustments, and then effects. In this case with the ability to add in filters at any time I can mix that up more, and that's what I mean when I say that the workflow is more organic. I was pretty happy with the overall image except for the sky, which I felt was too light, it was trivial to deal with it as the final step of the process. I know that some people do further processing on their images in Lightroom after exporting to an external editor, but I don't like breaking up the non-destructive workflow, so this approach feels more natural to me. The only Lightroom adjustment I made to the Luminar edit was to sync the crop after working in Luminar. I only opted for that so that the crops would match identically and I wanted to start with the raw file in Luminar.

Now full disclosure, after my first post comparing Lightroom and Luminar, the folks from Macphun contacted me as they saw the post and invited me to join their affiliate program. I want to stress that this is purely an affiliate program, I am not being paid to write this content, and my relationship with Macphun is purely on a referral basis should someone purchase their software through my affiliate link.

Which processed it better 2? Donegal by Andrew Dacey

The Lightroom version, which is also the version currently in my portfolio

After I'd tried out Luminar on a recent image, I decided it might be interesting to revisit an older favourite image. In this case, I took one of my favourites from my trip to Donegal, Ireland last year. This photo was also an image I'd previously struggled with in Luminar, so I was curious to see if my increased familiarity with the program would produce a better result.

In this case, I'm quite surprised and pleased with the image. The detail enhancer filter can pull out details where you want it, and I think that's vastly improved the look of the cliffs. I'm quite pleased with how much extra detail there is in this image.

The Luminar version

Again, I've gone more saturated, and I think this may just be a shift in my style as I wasn't deliberately pushing for saturation with this image, merely working toward what I felt the image needed.

I'm also quite enjoying the fog filter; it's used quite subtly in this image to enhance the atmosphere that was present in the original image. I've tried to keep it subtle and only brushed it into areas.

Similarly, I've used image radiance and Orton effect to add some "glow" to the image. Again, I've brushed this away from parts of the image where I didn't feel it was suitable. For the Orton effect, I've limited it solely to the water and foreground beach area. I was finding that the beach had gone a bit darker than I liked, and the filter has also nicely accentuated the smoothness of the long exposure.

Lightroom or Luminar: Which processed it better? by Andrew Dacey

I made this version of the image in LIghtroom fairly quickly while travelling in Florence.

As I noted in a previous post, I've used some of Macphun's (soon to be renamed to Skylum) apps for a while now, but only sparingly. Because of that, I had purchased Luminar when it came out last year, but it never really gelled with me and my workflow.

With the recent release of Luminar 2018, I decided it was time to give it another try. For whatever reason, this time it did "click" with me better, and I'm starting to be happier with some of the results I'm seeing.

I made this more dramatic processing of the image using Luminar.

Despite the provocative title, I don't think you can easily say one tool is better than the other. What I'm noticing with Luminar is that the workflow is different enough that it takes me down a different path. I think that's part of where I was frustrated before. Previously, I'd attempt to duplicate an image's look in Luminar. That's not the point of using a different tool though. If I could just replicate the same look and nothing else why bother switching in the first place? I think you have to be willing to look at a new tool as its own thing. Luminar has a very different workflow compared to Lightroom. That's both good and bad if you're expecting to carry over your Lightroom workflow, then you'll be frustrated. If you embrace the Luminar workflow, for what it is, then you'll possibly find that you go down a different path.

So far, for me, I'm finding that Luminar works for me when I'm pushing for a more heavily processed, dramatic style. Maybe that's because I'm still getting used to some of the sliders, but I find it's quite easy to dial up the drama, and when an image is suited to that approach I think it's working quite nicely.

The other big area that's taking some adjusting for me is the approach in Luminar that you can mask everything. I'm still working with this to figure out what the best strategy is for this style. While previously working on this test image I'd masked individual filters. This time, I opted for a plan of making my global edits on one layer, then I added a separate layer for the filters to be applied to the sky and the water. I created a new layer and inverted the mask from the sky/water layer to address the buildings. Finally, I used the exposure filter on two separate layers for dodging (increased exposure) and burning (reduced exposure). For some reason, I was having issues with the dodge and burn filter, so this approach worked better in this image. Personally, I've not been too fond of the dodge and burn layer as I'm not sure I like the method of just painting with lighter or darker, I prefer the approach of painting in an adjustment but still having control of the adjustment after I've done that work. But there are lots of ways to get to the same result.

Talking about adjustments brings me to one other area with which I'm still getting used. On the one hand, the ability to mask any filter (either on its own or as a layer mask) is immensely powerful, but sometimes I just want the simplicity of Lightroom's adjustment brush. If I just want to pop a bit of exposure into an area or paint in some warmth, I find the adjustment brush to be a bit more intuitive. With Luminar I'm still thinking about what filter do I want to use, then should this be a separate layer? It's very powerful, but it's not second nature to me yet. I suspect that's more the type of thing that will come with time.

The one feature I'm still waiting to see in Luminar is how the organisation feature will work. I like that Luminar can work with a non-destructive workflow, but it still processes the image on reopening, and this is one area where I feel that Lightroom has a better experience. If I've developed an image previously, then I don't end up with a very noticeable delay in opening up the develop module for that image. The organisation feature is coming in 2018 for Luminar, so I'll be interested to see how this works for a cataloguing workflow. I'm not convinced I need to switch away from Lightroom, and Luminar integrates into that workflow well anyway, but I'd like to consider my options.

The Edit: Peggy's Cove, Part 2 by Andrew Dacey

The final edited image

Introduction

In part 1 of this series on my edit for my recent Peggy's Cove image, I showed how the original unedited raw file looked on import and what I adjusted globally within Lightroom. That had the image well on its way to looking good, but I felt that there was still more I could do to take it to the next level. First I performed a couple of local adjustments within Lightroom, and then I finished the image in Photoshop.

The graduated filter, with overlay shown in order to show what areas I painted away from the filter.

Graduated Filter

I wanted to add some drama to the sky in this image, so I used the graduated filter to perform several adjustments. I wanted to accentuate the warm-cool look, so I shifted the white balance slightly cooler and adjusted the tint toward magenta. While these values are only -6 and +2 respectively, a little goes a long way when it comes to the local adjustment settings for white balance.

I remember that I tried darkening the sky with negative exposure, but wasn't happy with the results. Instead, I reduced the shadows and the blacks while increasing the contrast and saturation. This change made the clouds much more ominous while maintaining the brighter parts. As you can see in the screenshot, I pulled the filter quite far into the image, but then I used the brush to mask out the parts of the image I didn't want to be impacted. The masking brush is a fairly recent feature in Lightroom, and it makes the graduated filter even more useful.

Again, I've turned on the overlay so that you can see what areas were hit with the brush to accentuate the warm light near the horizon.

Brush

The graduated filter did a lot to help the sky, but I wanted to highlight the warm sunlight even more, and I used the brush to achieve that. In this case, I just used a bit of a warmer white balance and some extra saturation. It may look like I'm using a relatively high setting on the white balance, but this is in the same area that was already being cooled by the graduated filter, so I had to use a higher setting to bring back the warmth along the horizon.

The image after all Lightroom edits were applied.

Photoshop

After completing the local adjustments, I was feeling quite happy with the image, but I knew that there were still a few things I wanted to clean up. I initially attempted cleaning up the distracting spots in the water with the spot healing tool in Lightroom, but there were just too many of them, and it wasn't practical to do it in Lightroom. I opened the image as a smart object in Photoshop and then used the spot healing brush in Photoshop, with content aware fill to clean up the spots. I almost always send my files to Photoshop as a smart object so that I can get back into camera raw and modify those settings if I want to. Sometimes after making further adjustments in Photoshop, I'll see something that I need to change in the raw file adjustments, and this saves me a trip back into Lightroom. I performed the healing on a separate layer so that I could maintain a non-destructive workflow.

The image after cleaning up the distracting elements in the water and cropping.

After completing the healing, I decided to crop the image to cut out some of the distracting seaweed at the bottom of the image. I'd tried cloning it out, but it was proving time-consuming, and I didn't feel like I was losing much by cropping it out. You do get a little less of the reflections in the water, but I felt this was an acceptable compromise in this case.

A reminder of what the original raw image looked like on import.

I created a new smart object from the healing layer and the raw file's smart object. Having one smart object of all of my combined edits allowed me to apply smart filters to the entire image. It can get a little confusing with nesting objects like this, but I find the extra flexibility to be quite valuable. I used Macphun's Intensify CK to apply effects to the whole image; Detail Extractor and Landscape Enhancer. Unfortunately, this is one aspect I can't show in this tutorial. While Intensify can be applied as a smart filter, it doesn't work correctly. I've reported this as a bug to Macphun. It will look like the smart filter is applied, but if you edit your smart object, or otherwise try to modify the smart filter settings, you'll lose whatever effects were previously applied. I do remember that I reduced the opacity for both layers, I think one was 40% while the other was 70%. Apparently, only Luminar and Tonality currently support being used as a smart filter. I've briefly tried out Luminar but haven't quite warmed to it yet. At some point, I'm planning to try recreating some of my favourite images in Luminar, or Tonality if they're a black and white, to get smart filters working properly and to update them to the newer software.

The Edit: Peggy's Cove, Part 1 by Andrew Dacey

The finished image for my Peggy's Cove image

Introduction

I've been wanting to write a blog post walking through my editing process for some time now. It's evolved quite a bit since my last posts that walked through some of my edits, which were from several years ago.

My recent trip back to Nova Scotia wasn't predominantly aimed at photography, but I did make an effort to pack a bit of gear. Usually, if I'm just casually travelling, I'll pack one Fuji X-T1 and one or two lenses at the most. For this trip, I packed the one body and the 18-55mm kit lens (which for a kit lens, is shockingly good), as well as my MeFOTO Roundtrip tripod and my Lee Seven filters. The camera and kit lens has become a typical "walk-around" setup for me, and the tripod and filters didn't add much extra heft at all.

Capture

I grew up in Nova Scotia and had family that lived near Peggy's Cove, it's always been a favourite area for me, and one I've wanted to shoot more of as I've gotten more serious about my photography and improved my landscape skills. Unfortunately, the area of the lighthouse is horribly touristy and is typically overrun most days. However, if you just go slightly away from the lighthouse, there are still tons of great areas to shoot that are much less crowded. I was travelling with my mother and my girlfriend and noticed the light and clouds in this spot. We didn't have a lot of time, so this had to be a quick setup. I knew I wanted to use an ND filter to smooth out the water; I tried with the 3-stop filter first but saw my exposure wouldn't be long enough, so I moved up to the Little Stopper 6-stop filter to get a 2-second exposure at f-11.

The original raw image with no edits.

Global Edits

I'm currently using Lightroom for editing all of my raw images. The initial import was quite flat and dull, which is typical for raw photos. It's worth noting that I do apply some of the edits I'm about to describe as a preset during the import process. I never actually saw the image as it appears in this post, but I thought it was worth sharing the unedited original image just to show the full before and after  I think this also highlights why it can be worth creating some good presets that get you into the ballpark and apply them on import. I could have easily looked right past this image if I'd seen it in its original form.

The specific Lightroom settings I used for my global settings.

I've been following some of the advice from Serge Ramelli's landscape classes and now start with dragging highlights down to -100 and shadows up to +100. My preset also adds quite a bit of clarity and vibrancy into the image, which I dial back on the saturation a bit to keep things from getting a little too garish. I always manually set the white and black points to my liking for the particular image. I will play with the vibrancy, and clarity for individual images but this is a great starting point. The final thing I do for my landscape preset is that I set the camera profile to Velvia, this is a profile for Fuji cameras, and it does help get the classic look of Fuji Velvia film. The other obvious thing that needed adjusting was the white balance. I typically leave my camera on the cloudy preset since I can always adjust it in the raw image later and this is a decent starting point. Especially with long exposure shots though, I find the filter creates quite a noticeable blue colour cast, and you do have to adjust this. I wanted to highlight the warmth of the beginning sunset, so I went for a relatively warm starting point.

My sharpening settings.

The other step I took was to adjust the sharpening. Again, I add my baseline sharpening settings in my preset, so mostly this is just tweaking things a bit. I use a relatively high sharpening value, but then control where it's applied by using adjusting the masking This allows me to add in extra sharpening where I want it while eliminating it from large open areas such as skies or water, where it would be distracting.

That was all I did on a global level. For a lot of images, that's all I do to the image. I picked this particular image because I did a much heavier edit than normal, so it made for a much more detailed demonstration of what I'll do to an image that merits a more in-depth edit.

The results after applying my global edits.

I've decided to split this post up into two parts to keep the length down. Next time I'll discuss the local adjustments I performed in Lightroom, as well as covering the finishing touches I made in Photoshop. I hope this has been useful to some of my readers. Please leave a comment on this post if you'd like to see more posts like this in the future.

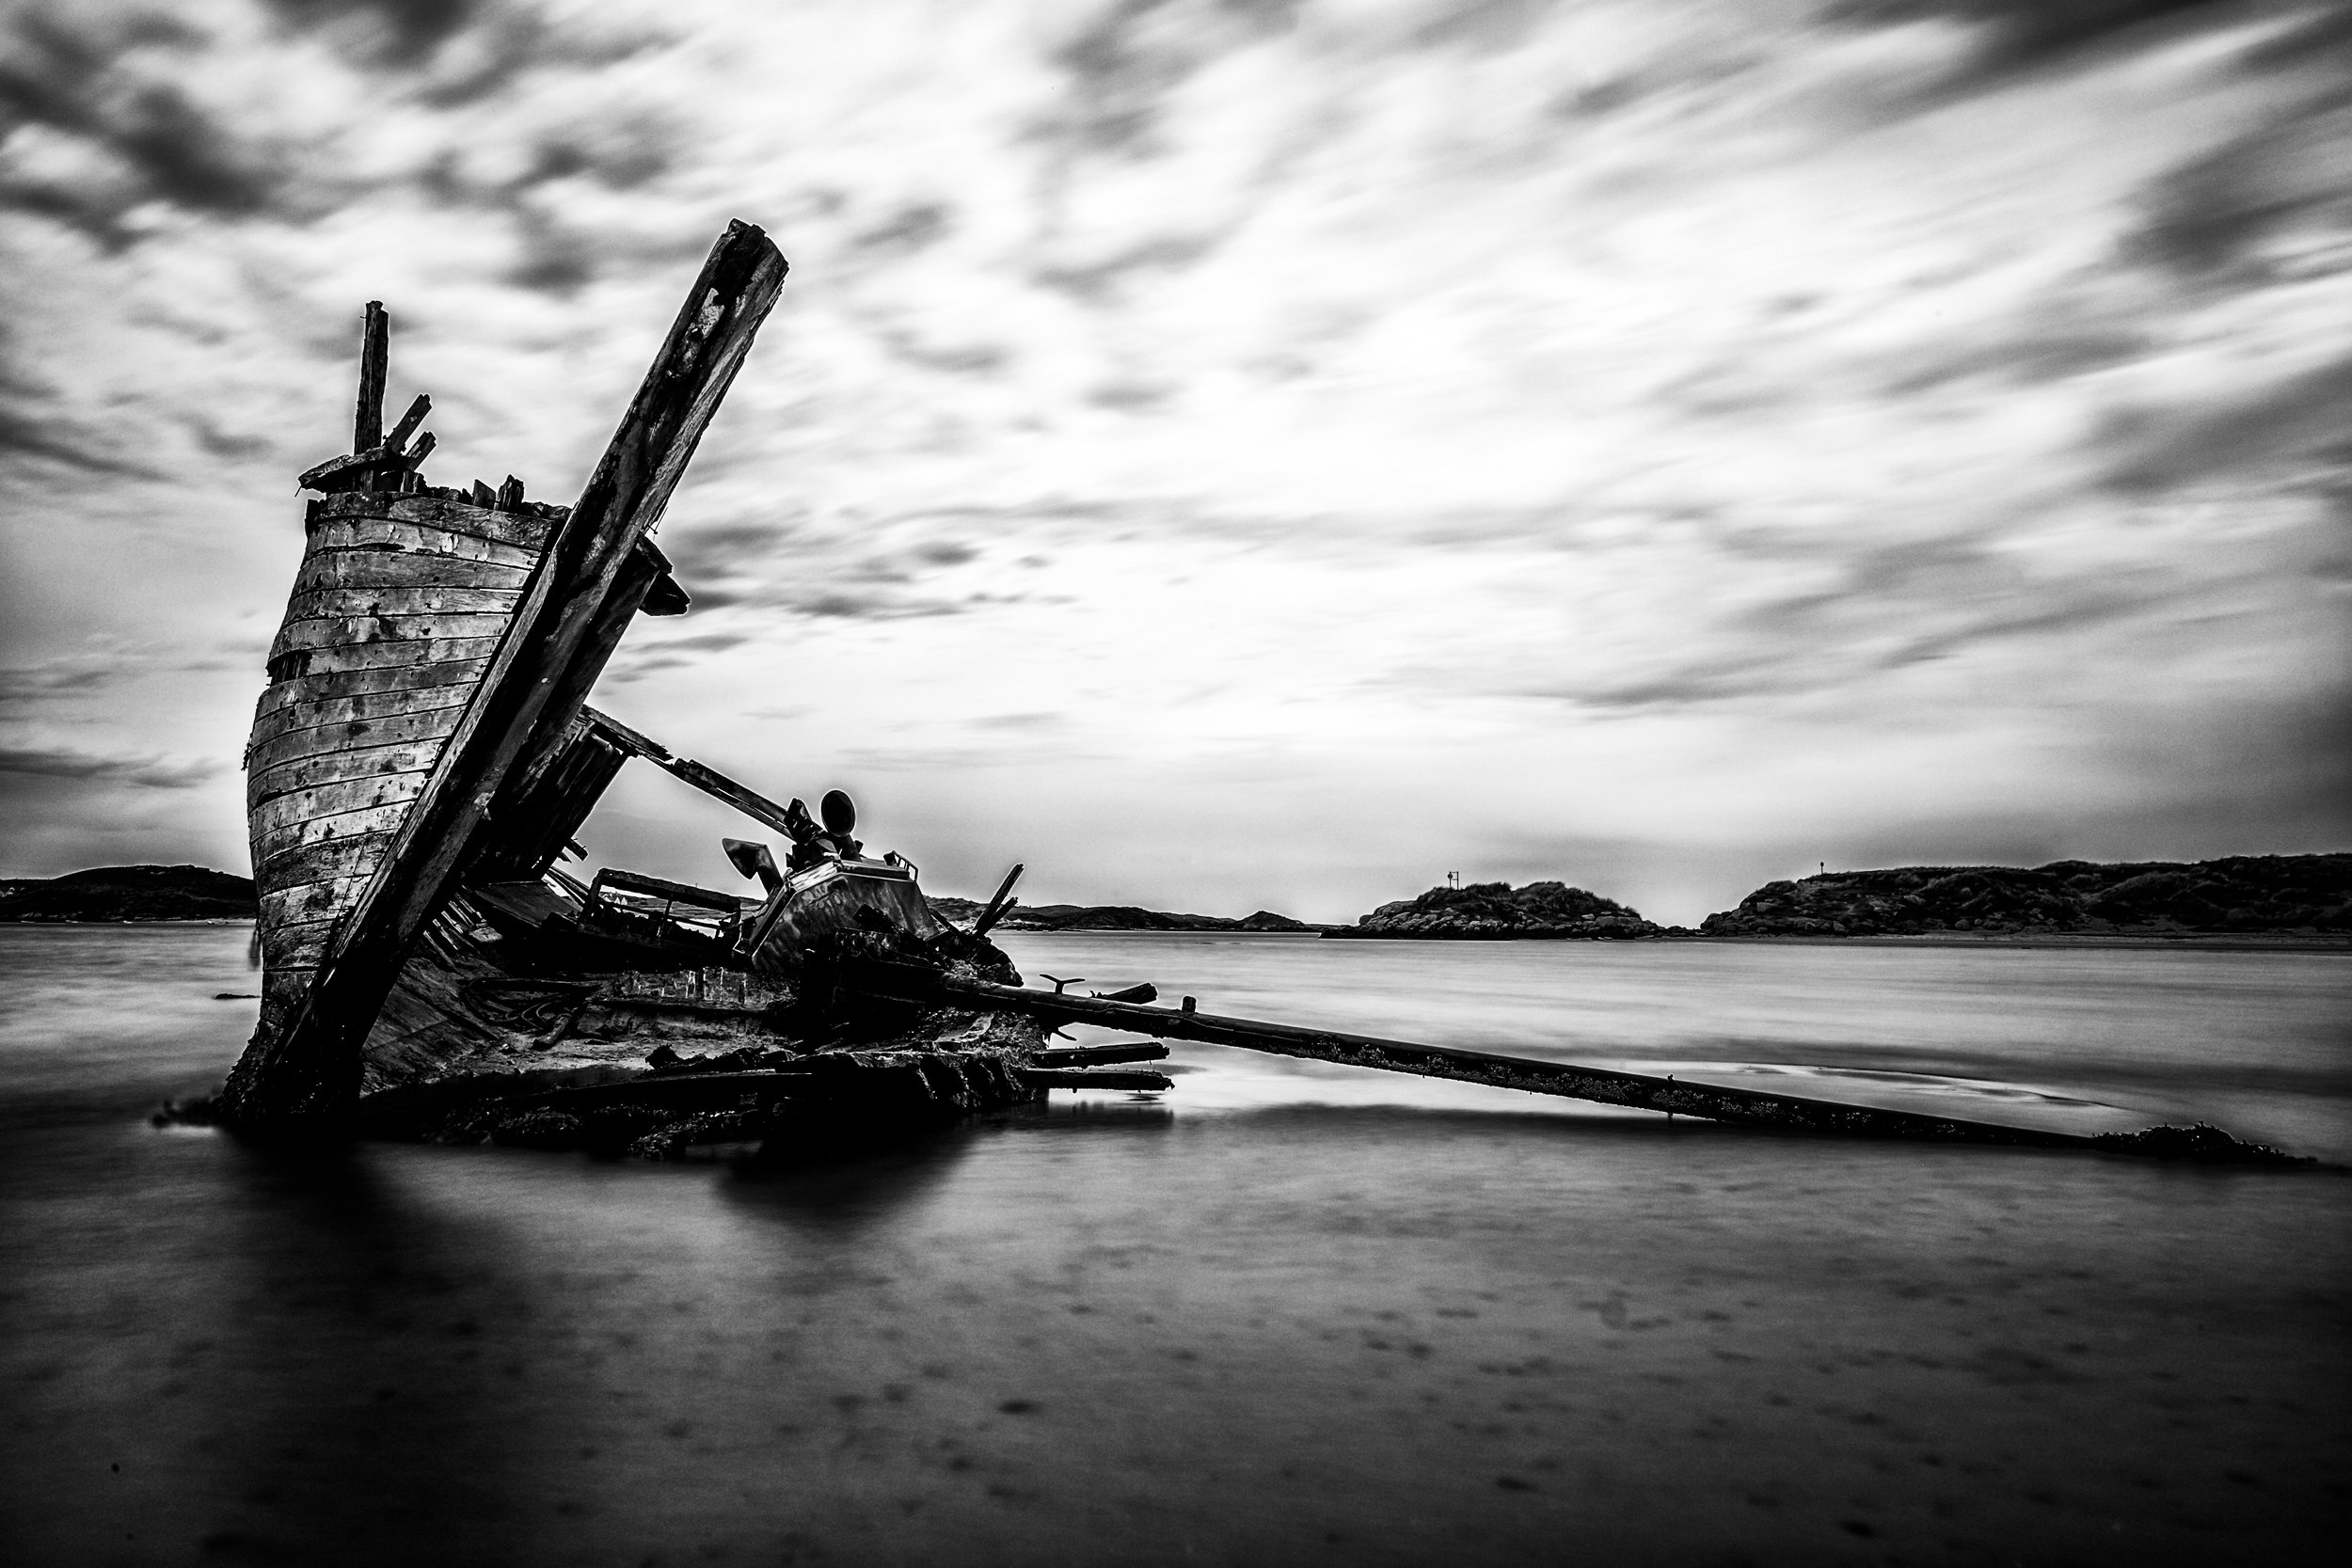
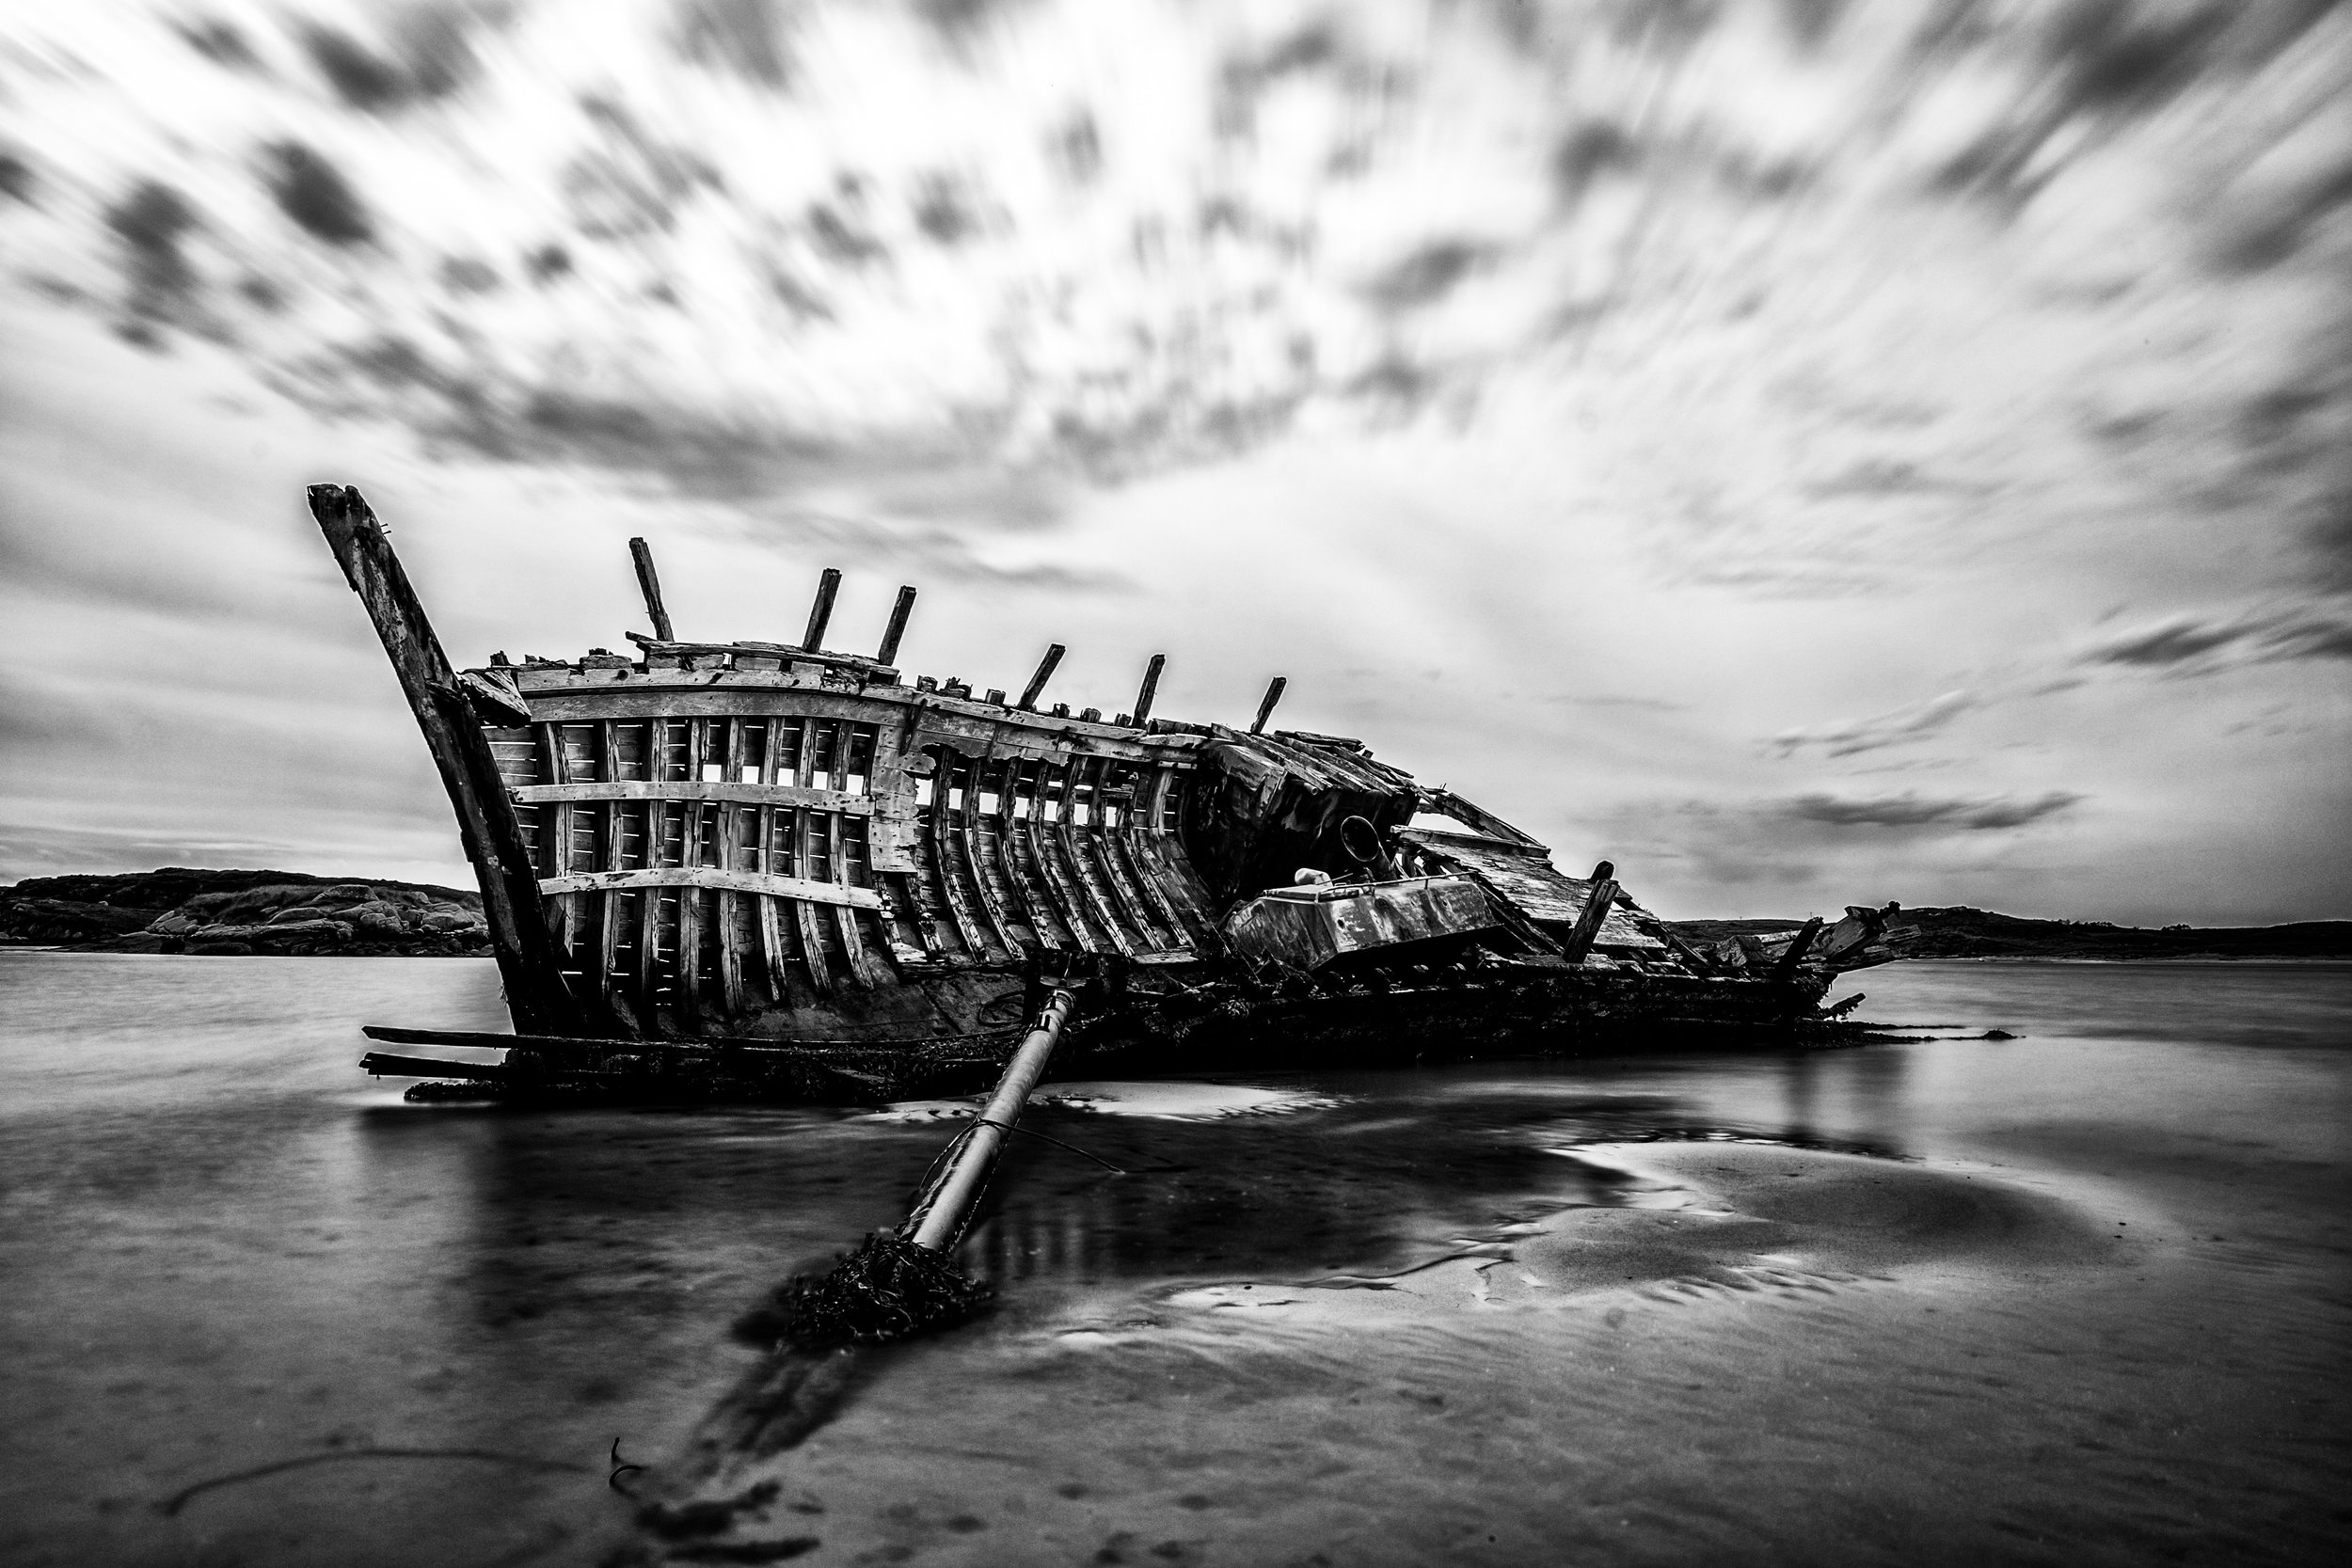
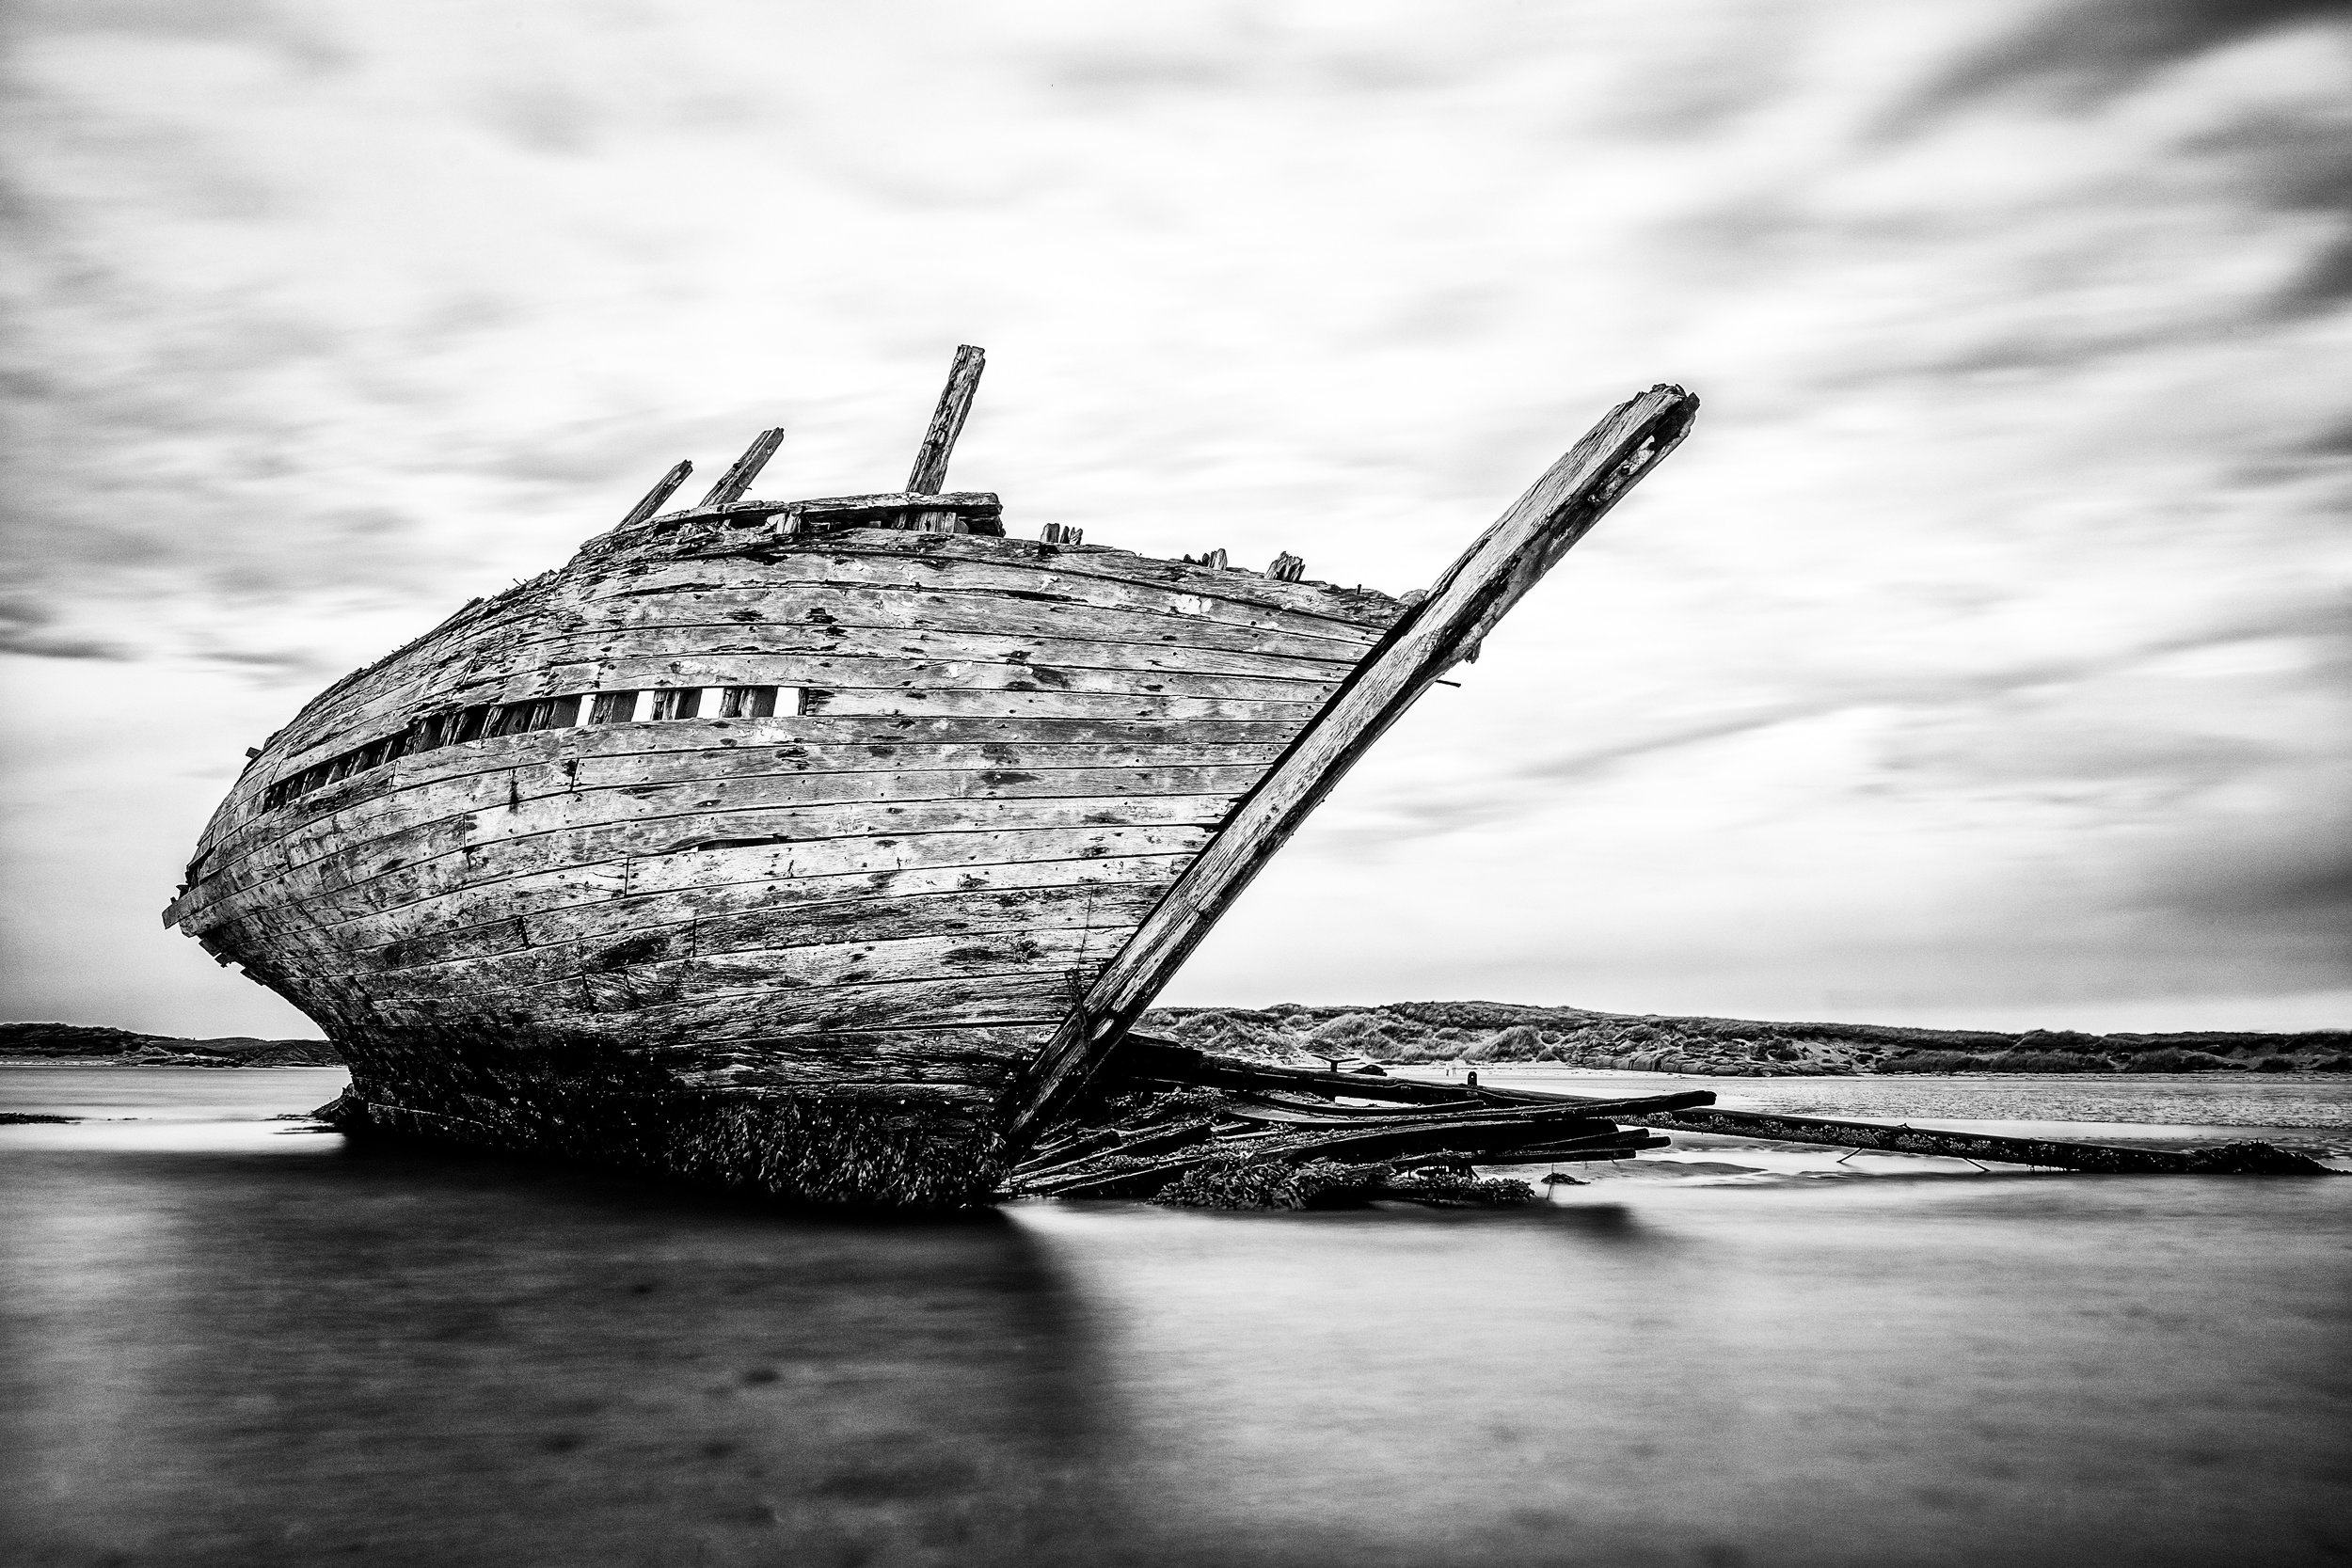
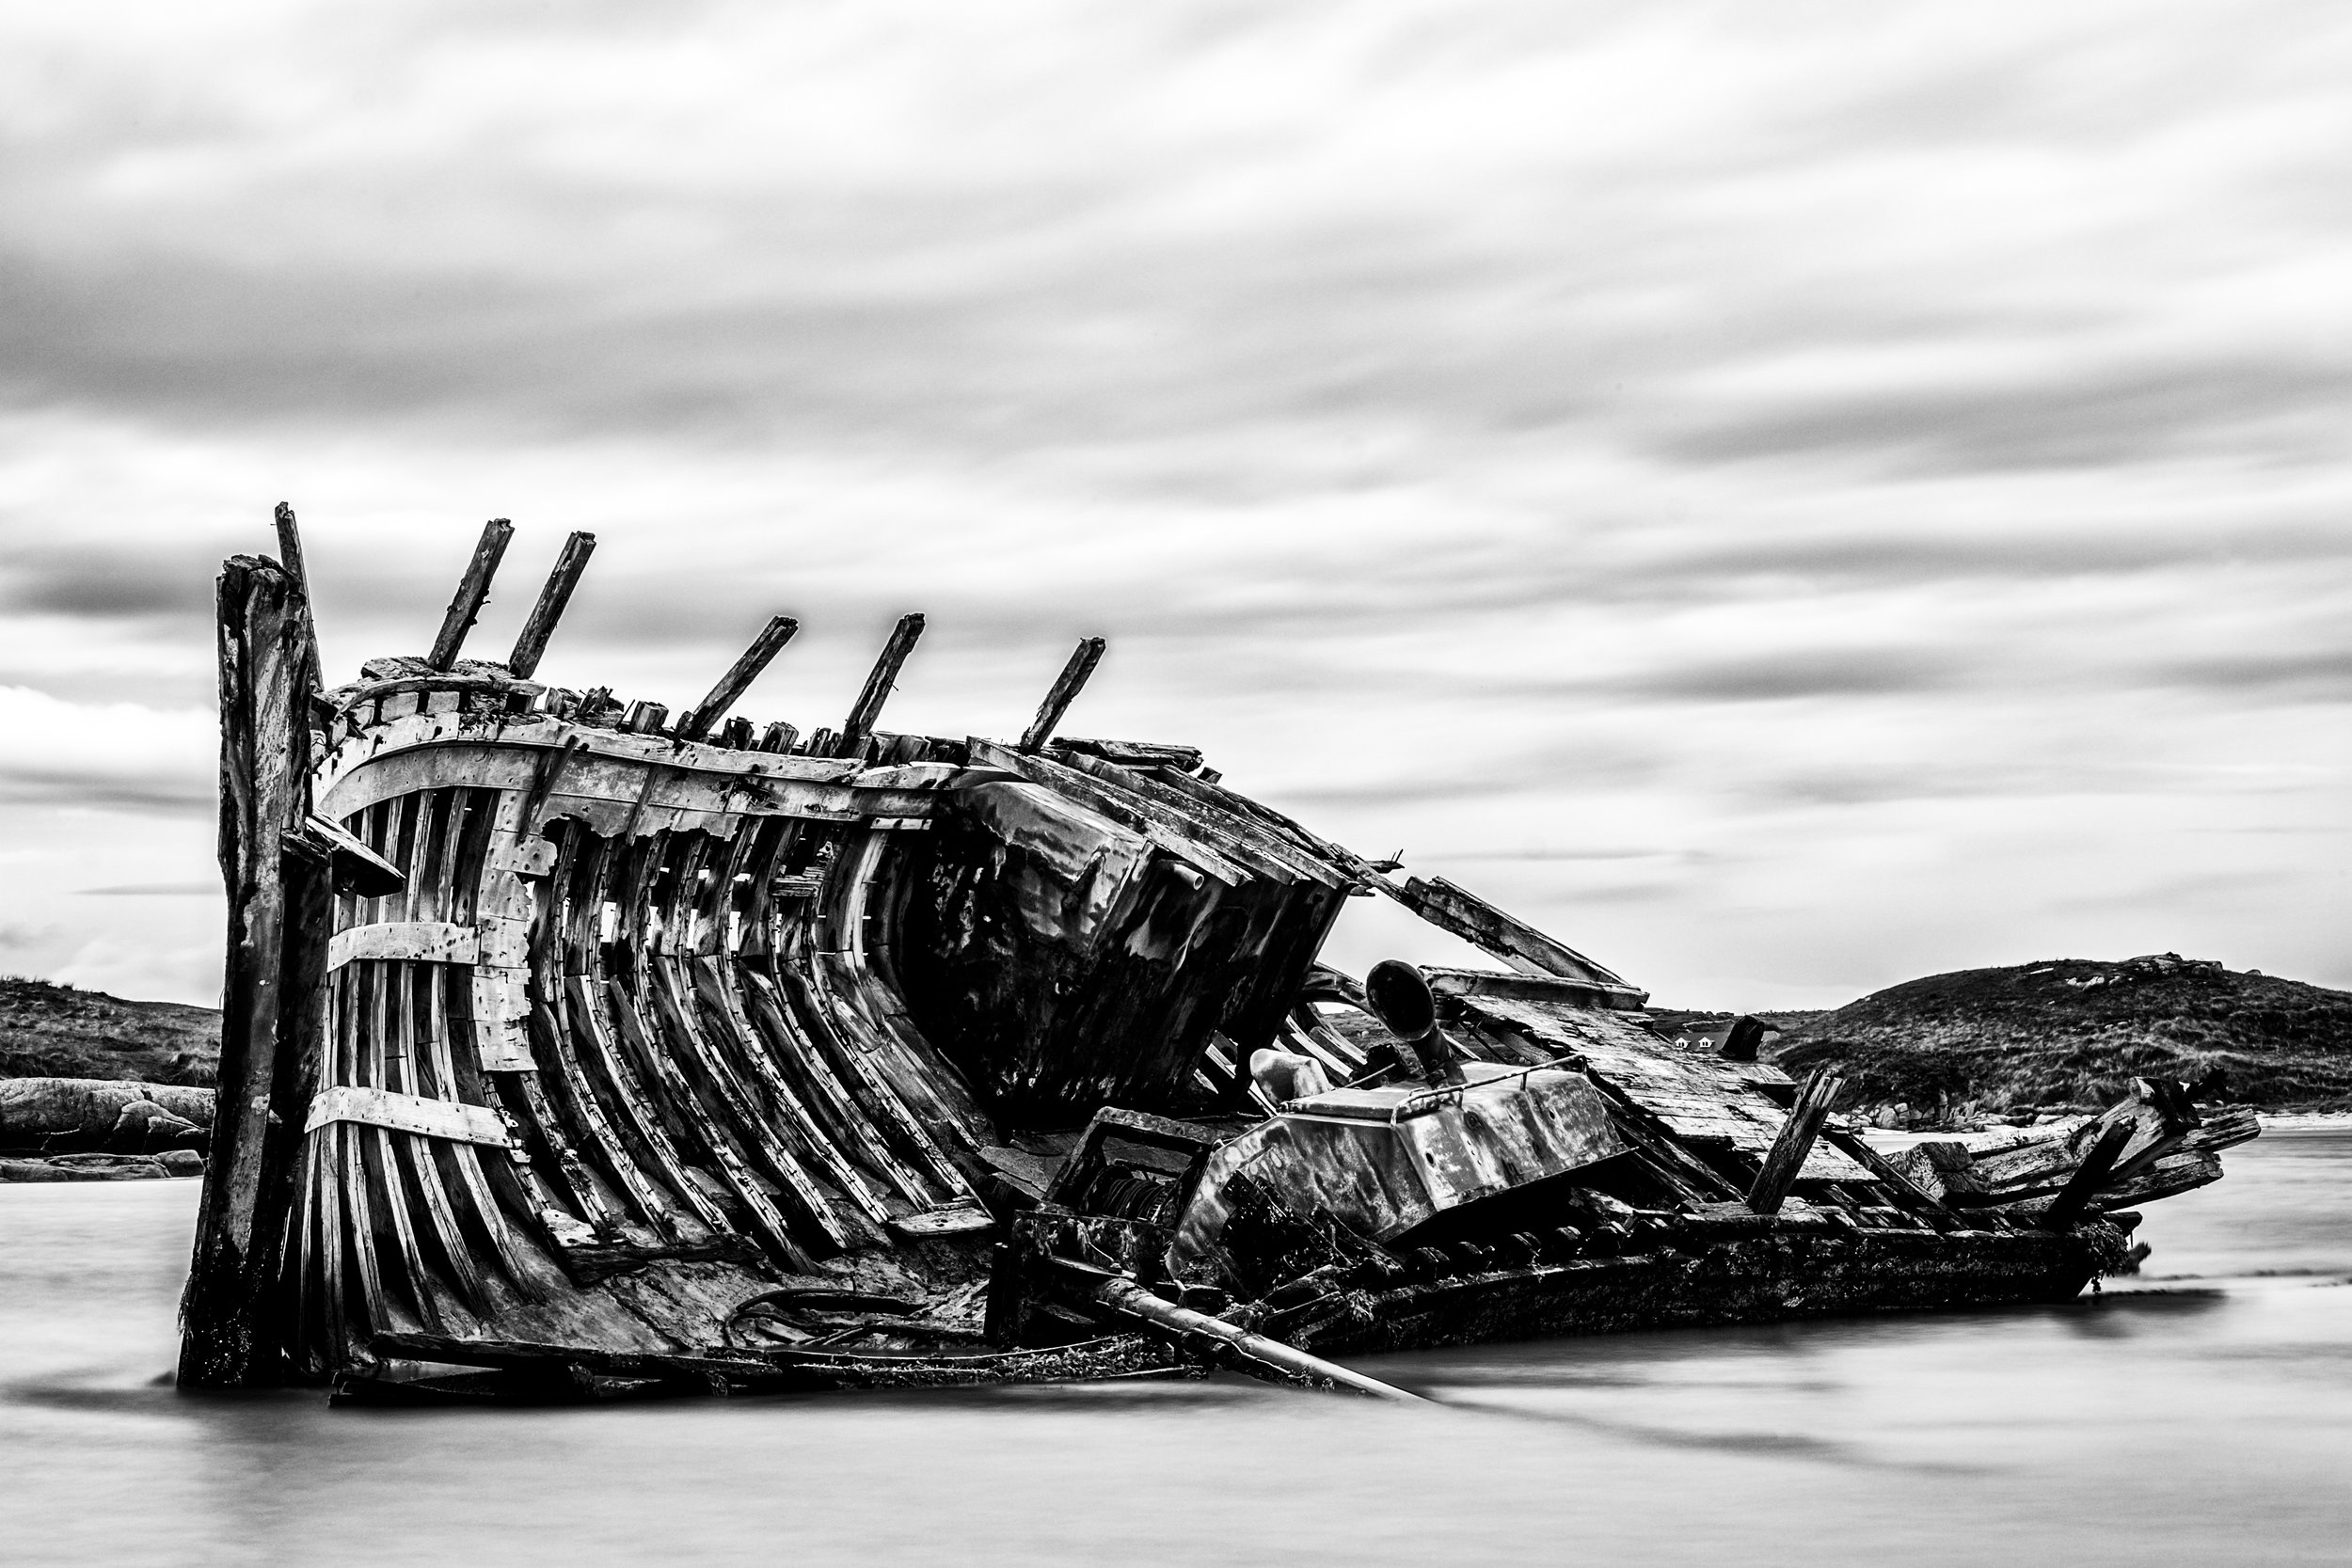
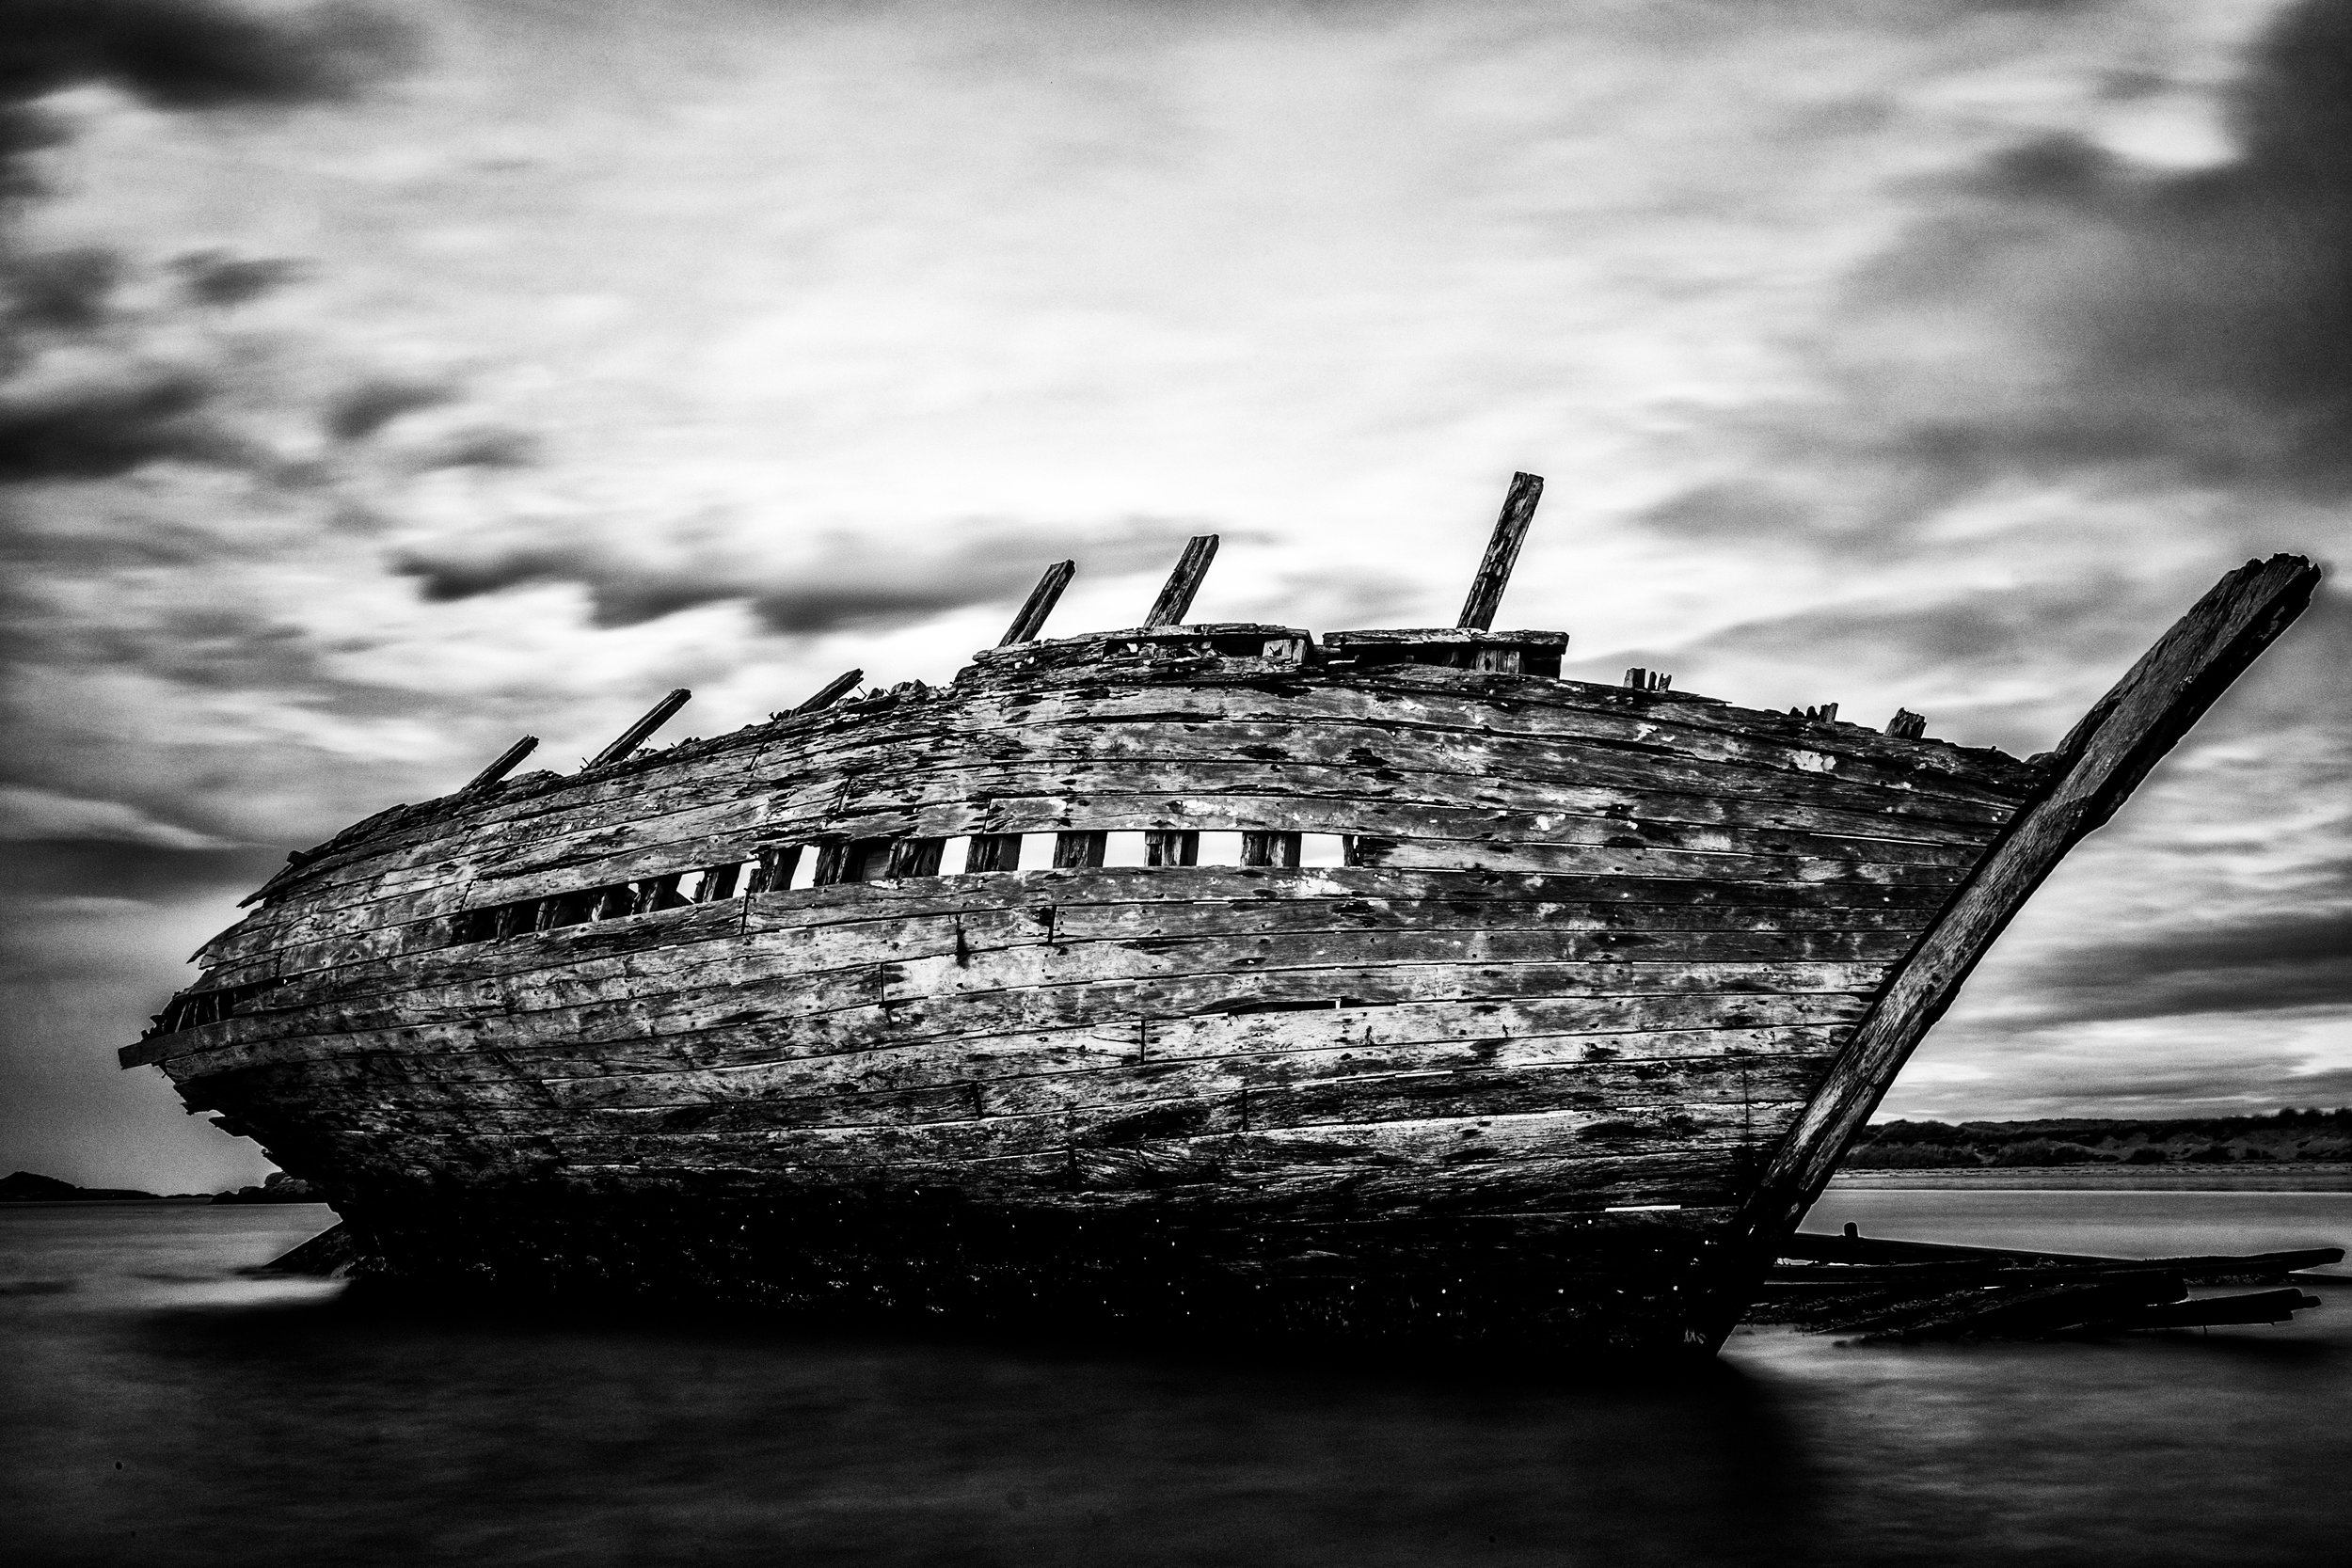
Donegal: Bád Eddie by Andrew Dacey

I'm experimenting here a bit with how to best show off sets of images on the blog. I think the slideshow option might be nice for a series, but I'm curious what people think and whether it would be better to allow for full-screen viewing of the images. What I do like about having the slideshow is that it at least presents one big image when you first load the page, which I think is a bit more eye-catching than just having a block of thumbnails.

Continuing on here with my idea of stories, I'm at least looking at logical image sequences that I can present on my blog. Obviously, this is a set of images all exploring this one wrecked boat. In this case, this would be Bád Eddie (or Eddie's Boat), at An Bun Baeg, Ireland.

The boat apparently ran aground in the 70s and has been there ever since. It's really starting to deteriorate now, and it's unclear how much longer it will remain. We visited in the morning to catch the low tide. We were able to get quite close on the sand and it was only toward the end of the visit that the water began to come in. It was really nice having the opportunity to explore the compositions both with the sand and with the water. With a group of photographers, we did have to be a bit careful to stay out of each other's shots and to be aware of leaving footprints, but everyone was quite cooperative and we did a good job of waiting to confirm that everyone was done with further away shots before approaching closer.

In the interests of full disclosure, there were some warning signs on the boat to not climb on top of the boat, I found them distracting and I've removed them. Given that I'm going for a more artistic rendition here, rather than strictly documentary, I don't feel that this is a problem.

Life back at Crashplan by Andrew Dacey

I'd posted last week about my deliberations on what to do now that Crashplan had announced that they would be ending all home accounts and only supporting business accounts.

As I mentioned in that post, there have several cloud backup services that previously offered unlimited storage have either gone out of business or changed their pricing models, which makes me concerned for the long-term viability of the model. Because of that, I was doing a trial of Backblaze's B2 cloud service and Arq Backup as the backup software on my Macs. I noted that I wasn't completely happy with this solution.

After some further deliberation and number crunching, I ended up sticking with Crashplan but upgraded to the small business account. On paper, this was going to be significantly more expensive at $10/month; I have 3 Macs that I backup with Crashplan and was previously paying $12/month on the family plan. However, Crashplan was offering a 1 year 75% discount on their small business account so for the short-term I'm actually going to save money and this buys me another year to consider my options more thoroughly and to possibly cut over to a new service in the interim without the looming threat of my current backups ending.

So let's look at the other options I did consider:

Backblaze

This may still be the overall winner for me long-term. I wasn't completely happy with the way Arq was handling my backups but the B2 service seems overall good and I can also add some files from my NAS to the same service so that's a possibility. Alternatively, I could opt for backing up my computers with their regular backup service and get some of the features I felt were missing from B2. Longer-term, maybe I can hope that they'll expand the B2 service to cover some of the gaps, or allow for a shift over to something closer to B2's storage-based pricing, or ideally even allow me to port my backups over to B2. That's a bit of speculation. The lack of a richer restore function is still a bit of a concern, but the ability to have a drive mailed to me is nice.

Carbonite

I considered it, but there's several deal breakers here. I could never quite tell if adopting an existing machine would require a re-uploading the data or not, but the big one for me was the ridiculous pricing that would require me to pay more money just to backup an external drive. On top of that, I'd also have to manually enable any large files for backup. The whole thing just seemed too clunky and the pricing felt punitive. They're really not doing themselves any favours in this regard as far as I'm concerned. Crashplan and Backblaze have clear, up front pricing, and it's 1 tier for the features. Carbonite just didn't stack up as a viable option in my mind.

Telling stories by Andrew Dacey

Dunlewey Church, Poisoned Glen, Ireland.

I like this image, it's not the best from my trip to Donegal, Ireland, but I'm still quite fond of it. I love old buildings like this. I think this works as a single image, but I'm not really sure it tells much of a story. Maybe it's more shots of the same church, maybe it's building up a collection of abandoned buildings or abandoned churches. There's something here I think, but it's not quite there yet.

One of the more common pieces of advice you'll see regarding how to improve your photography, once you get beyond the basics of technical advice, is to create images that tell a story, either as a single image or in a series of images such as a photo essay.

I absolutely love telling stories. If you get me talking it's often hard to get me to stop rambling about some type of story. I'll even recount friends' stories to others. I love reading novels and getting immersed in the story that the author has woven. I've often dreamt of writing a novel and sharing my stories with others.

When it comes to my writing I tend to have a very strong sense of the visual in my mind, and the struggle I have is conveying those visuals into words. What's unusual, is that for some reason I have a huge block when it comes to working in the other direction. For whatever reason, my brain seems to segregate stories into words whereas when I'm working with photos I'm purely thinking about the visual and how to compose an image.

I think there are two ways forward. First, I should work on my writing more often. I'm trying to write more blog posts on this site, and some of my other sites. Given how important writing is to me, it seems like this is a skill I should work on developing more. Meanwhile, on the image side of things I think I need to start exposing myself to more visual stories, either looking at single images that tell a strong story or looking at photo essays that resonate with me. I think this is one area that I've been somewhat lacking in, I don't have a lot of good role models in this space in terms of what I want to emulate. Then in the longer-term I should start looking for opportunities to try to tell my own stories in a visual way, either just with images, or with a mix of photos and words.

Life after Crashplan by Andrew Dacey

So I'm a bit late to the party here, but Crashplan has recently announced that they're going to stop offering home accounts. They've been my cloud backup solution of choice for several years now so this has put me in a bit of a bind with having a few months to sort out a new option.

There have been several recent closures of online storage options that offer unlimited storage, while other companies have stayed around but dropped their unlimited tier. There are a few players left that offer unlimited storage, but the direction within the industry doesn't leave me hopeful that they'll be able to stick around either.

So, what have I done? So far I'm not 100% sure I like my replacement but I'm trying out Backblaze's B2 cloud service. This is not the same as their main unlimited personal backup service. There are some pros and cons that come with that. First, you do pay for the storage you use, but it's quite cheap. When I ran the numbers, I think for the amount of storage I use over 3 computers it will end up slightly cheaper annually than if I paid for their personal backup service instead. Given the concern I've mentioned about unlimited plans, this isn't necessarily a con anymore.

Now the downsides are this really isn't setup as a personal backup option in the same way that Crashplan was. It's much more of a generic cloud storage option for whatever you'll put on it (similar to Amazon's S3). You just get a web interface and some API keys, you need some kind of software on your computer that will backup your files to this storage solution. I'm trying out Arq as an option at the moment, so far on 30-day free trial.

As for the cons, there's definitely a few:

  1. You're definitely kind of rolling your own solution here, The B2 service is just storage with nothing else offered, you have to solve those problems yourself.
  2. While Arq simplifies the backup side, I still found it a bit clunky at first to setup. I forgot to write down my application key and when I generated it again there was no way to update the key in my settings, I had to delete the backup location and add it back. Fortunately, I was able to "adopt" my older files at least.
  3. The progress bar is a bit poor. It shows you what's been "scanned" and it shows how much has been uploaded in the current session, and what's remaining in the current session so far, but it's not really a nice indication of the progress of the overall backup. There's zero information on how much is remaining as the scanning seems really slow. I suppose the benefit is it starts backing up much more quickly, but Crashplan would fairly quickly sort out what had to be backed up and it was reassuring to see what percentage was completed, I don't see this in Arq.
  4. Arq encrypts everything, in a way this is fantastic, as it's a nice extra layer of security. The downside is it makes the online cloud file access useless. There's really no way to access your files on the cloud, you have to download Arq to restore your files on another computer.

Now I'm not 100% sure that I'm going to stay with B2, I'll certainly keep this updated on my blog with the overall progress. I looked at Backblaze's personal backup service and besides concerns with the unlimited storage claims, I really didn't like the restore options. It doesn't seem like restore is very well supported through their offering, you simply have the options to download a zip file, or to have a drive mailed to you, that's it. There's no rich restore functionality where you can select multiple files and where to put them on your computer, you'll really just have to download the zip file and move them afterwards.

I'm looking into Carbonite as an option as well, but so far I'm not entirely convinced. One of the things I'm really concerned with is the ability to "adopt" a computer. It suggests it's possible on Carbonite, but it also seems to suggest you have to restore all of the files from Carbonite, and may have to upload them again, I'm really not clear on this and their help documentation doesn't shed much light on things. They also will only keep the files from your old computer for 30 days, so that's a major concern as well. Plus their pricing model is much more complex and I'm still trying to make sense out of which options I need so that I can decide on the best package.
Updated design by Andrew Dacey

To go along with my recent updating of the galleries on this site I also wanted to update the look and feel. I was quite surprised to see that I'd not really changed the look of my site for 6 years and it was really starting to look a bit dated.

The biggest thing I'd wanted to change was the side navigation. It just felt like it was eating up way too much space, and competing for space with my photos. The new design has a much cleaner look overall and I'm quite happy with it.

It's been a very quick change in templates with only a few tweaks so I'm hoping that I've not broken anything. If you do stumble across any content that's not working please let me know.

Updated galleries by Andrew Dacey

Murder Hole Beach, Donegal, Ireland. Probably the best shot I took on the photo tour.

I've finally gone through the process of updating the galleries on this site. I've always intended for the two galleries to be a bit of a portfolio for me and to showcase the best of my work. For a long time though, I wasn't producing anything new. The last year, I went on a week long photo tour in Donegal, Ireland and raised the bar on my landscape shots. I'd long known that my "rural" gallery was somewhat lacking in quality and in the number of images I felt worth showing. After that trip, I'd been planning to at least update the rural set of images but hadn't gotten around to it. After some more shooting on trips, and producing more content that I wanted to share, I felt like it was finally time to push the latest stuff up there.

I'm quite pleased to have ten images in both galleries that I'd happily show. I think I'm doing far more to showcase my best work now. In particular, the rural gallery has seen a complete replacement, with ten new images and nothing from the old gallery making the cut. The urban gallery was less of an extensive overhaul, as there's still some favourite images in that gallery and I've not been shooting as much urban or street photography, but I have added a few shots also from the last year.

I'd love to promise that I'm going to keep the blog up on a more regular basis. It really is something I'd like to maintain, but I'm finding it difficult to post content regularly. I have some ideas for showing some tutorials on how I've worked on some of my images, and possibly discussing the making of some of the images, but I really don't want to make any promises at this point.

The other "big" change has been that I've finally jumped on board Instagram. I've added the social link to my site and removed Pinterest as I was never posting anything there and was only using it for inspiration.

Westminster Sunset by Andrew Dacey

Sunset on Bridge St. Westminster, London

Grabbed this shot on the way back to the tube after Scott Kelby's Shoot Like a Pro seminar. I had wanted to shoot a bit in the Westminster area after the seminar and on the way to the station I was worried that I'd missed the good light from sunset as the sky was quite dull. Then a few minutes later I started to see hints of pink showing up so I found a good vantage point and snagged a couple while the light lasted.

Make it cost shoot 15: Hal-Con by Andrew Dacey

The final shoot in the project! Yes, I did make it to my goal of getting 15 shoots in for the year. 

This last shoot was a bit special for me, first it's the only shoot for the entire project that I took in my home city of Halifax. As I mentioned before, travel really helped fill in this project for the year and I'm not sure if I would have made it otherwise. 

The other reason why this shoot was so important to me was that it involved me getting over my shyness about approaching people and taking their pictures. If anyone else is in a similar boat, my advice is go to something where people like to have their pictures taken. A sci-fi convention is a great opportunity to get some really interesting shoots and the people in costume expect to have their pictures taken. Everyone was really cool about it and it was never a problem. 

I still have a way to go before I'd be fully comfortable just walking up to someone on the street and asking if I could take their picture but this was a really big step for me. 

Make it cost shoot 14: Bakers Brook Falls by Andrew Dacey

Honestly, I think this shoot was a complete failure. It was a great hike but between the time of day and not having the right gear with me, I feel like it just didn't work. I'm not very happy with the light in this shot and I couldn't handhold a slow enough shutter speed to really get the silky water effect. I really wish I had my tripod with me and an ND filter so that I could get a better effect.

What I ended up doing was handholding several shots and layering them in Photoshop to get a bit of a better blurred water effect but it's still not great. Auto-align layers worked wonders though and the lighten blending mode works for blending in just the water. 

I think this is the best shot from the set but really the whole set was a big disappointment.