Blog

Which processed it better 2? Donegal by Andrew Dacey

The Lightroom version, which is also the version currently in my portfolio

After I'd tried out Luminar on a recent image, I decided it might be interesting to revisit an older favourite image. In this case, I took one of my favourites from my trip to Donegal, Ireland last year. This photo was also an image I'd previously struggled with in Luminar, so I was curious to see if my increased familiarity with the program would produce a better result.

In this case, I'm quite surprised and pleased with the image. The detail enhancer filter can pull out details where you want it, and I think that's vastly improved the look of the cliffs. I'm quite pleased with how much extra detail there is in this image.

The Luminar version

Again, I've gone more saturated, and I think this may just be a shift in my style as I wasn't deliberately pushing for saturation with this image, merely working toward what I felt the image needed.

I'm also quite enjoying the fog filter; it's used quite subtly in this image to enhance the atmosphere that was present in the original image. I've tried to keep it subtle and only brushed it into areas.

Similarly, I've used image radiance and Orton effect to add some "glow" to the image. Again, I've brushed this away from parts of the image where I didn't feel it was suitable. For the Orton effect, I've limited it solely to the water and foreground beach area. I was finding that the beach had gone a bit darker than I liked, and the filter has also nicely accentuated the smoothness of the long exposure.

Lightroom or Luminar: Which processed it better? by Andrew Dacey

I made this version of the image in LIghtroom fairly quickly while travelling in Florence.

As I noted in a previous post, I've used some of Macphun's (soon to be renamed to Skylum) apps for a while now, but only sparingly. Because of that, I had purchased Luminar when it came out last year, but it never really gelled with me and my workflow.

With the recent release of Luminar 2018, I decided it was time to give it another try. For whatever reason, this time it did "click" with me better, and I'm starting to be happier with some of the results I'm seeing.

I made this more dramatic processing of the image using Luminar.

Despite the provocative title, I don't think you can easily say one tool is better than the other. What I'm noticing with Luminar is that the workflow is different enough that it takes me down a different path. I think that's part of where I was frustrated before. Previously, I'd attempt to duplicate an image's look in Luminar. That's not the point of using a different tool though. If I could just replicate the same look and nothing else why bother switching in the first place? I think you have to be willing to look at a new tool as its own thing. Luminar has a very different workflow compared to Lightroom. That's both good and bad if you're expecting to carry over your Lightroom workflow, then you'll be frustrated. If you embrace the Luminar workflow, for what it is, then you'll possibly find that you go down a different path.

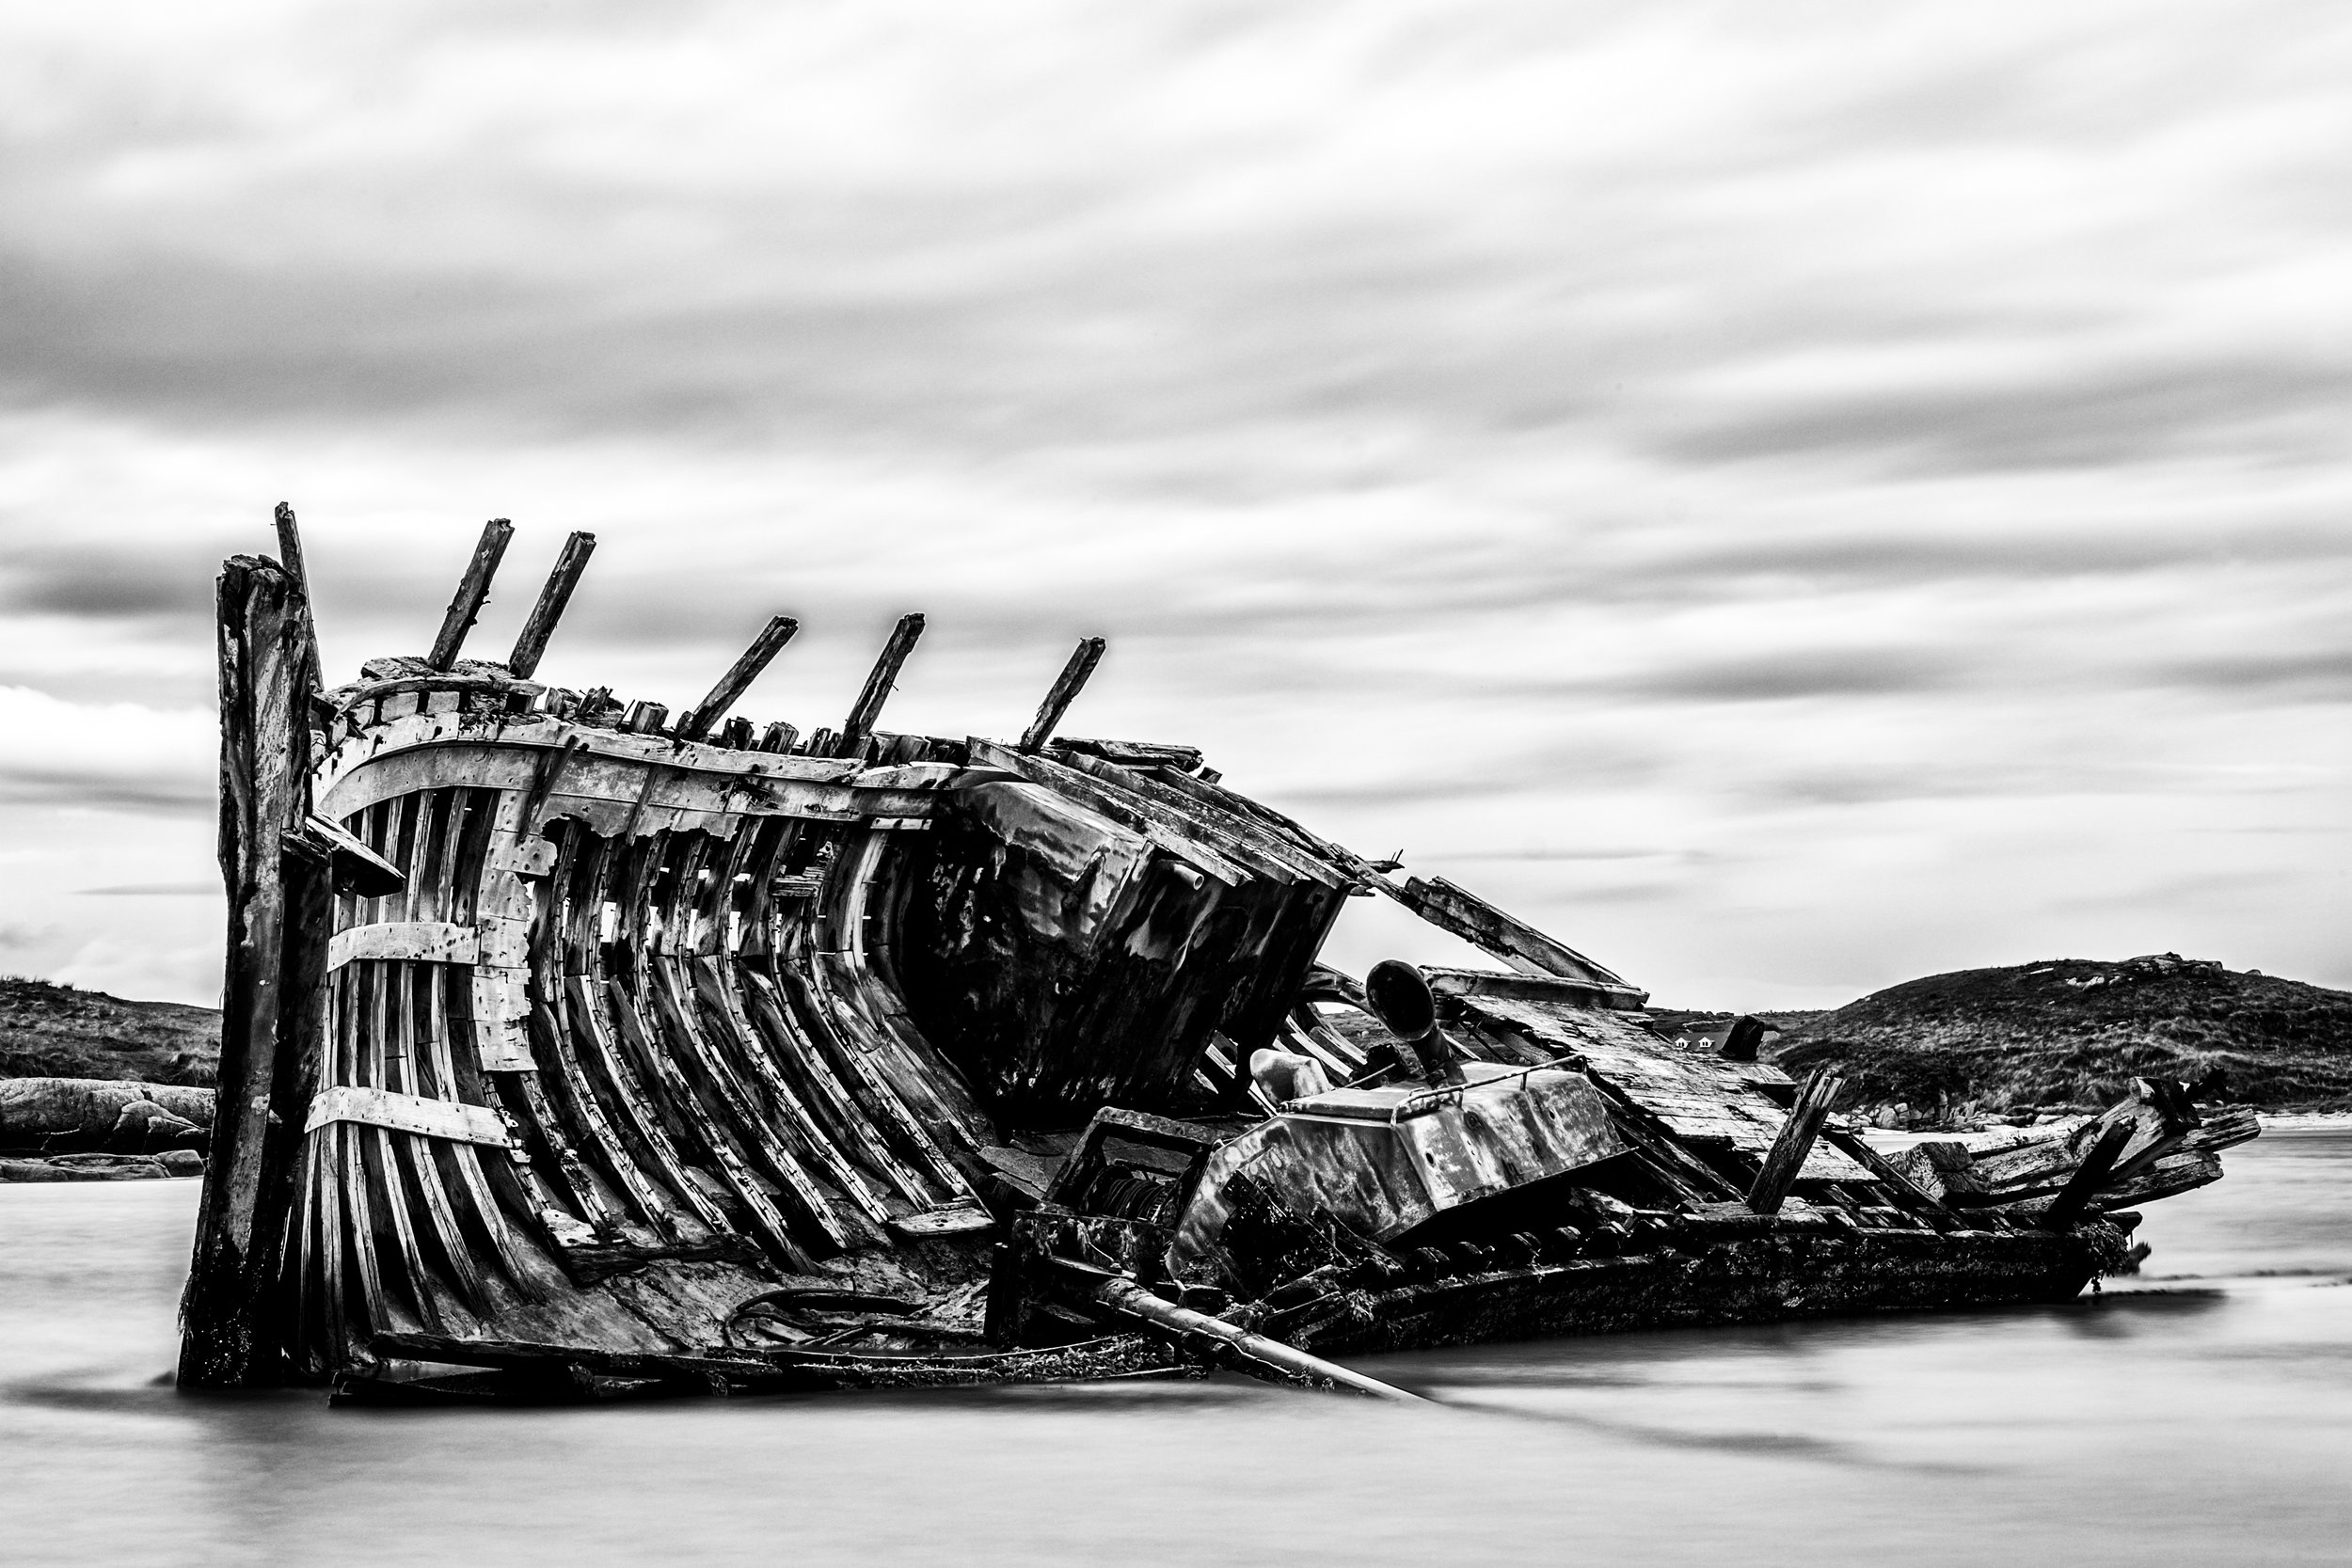
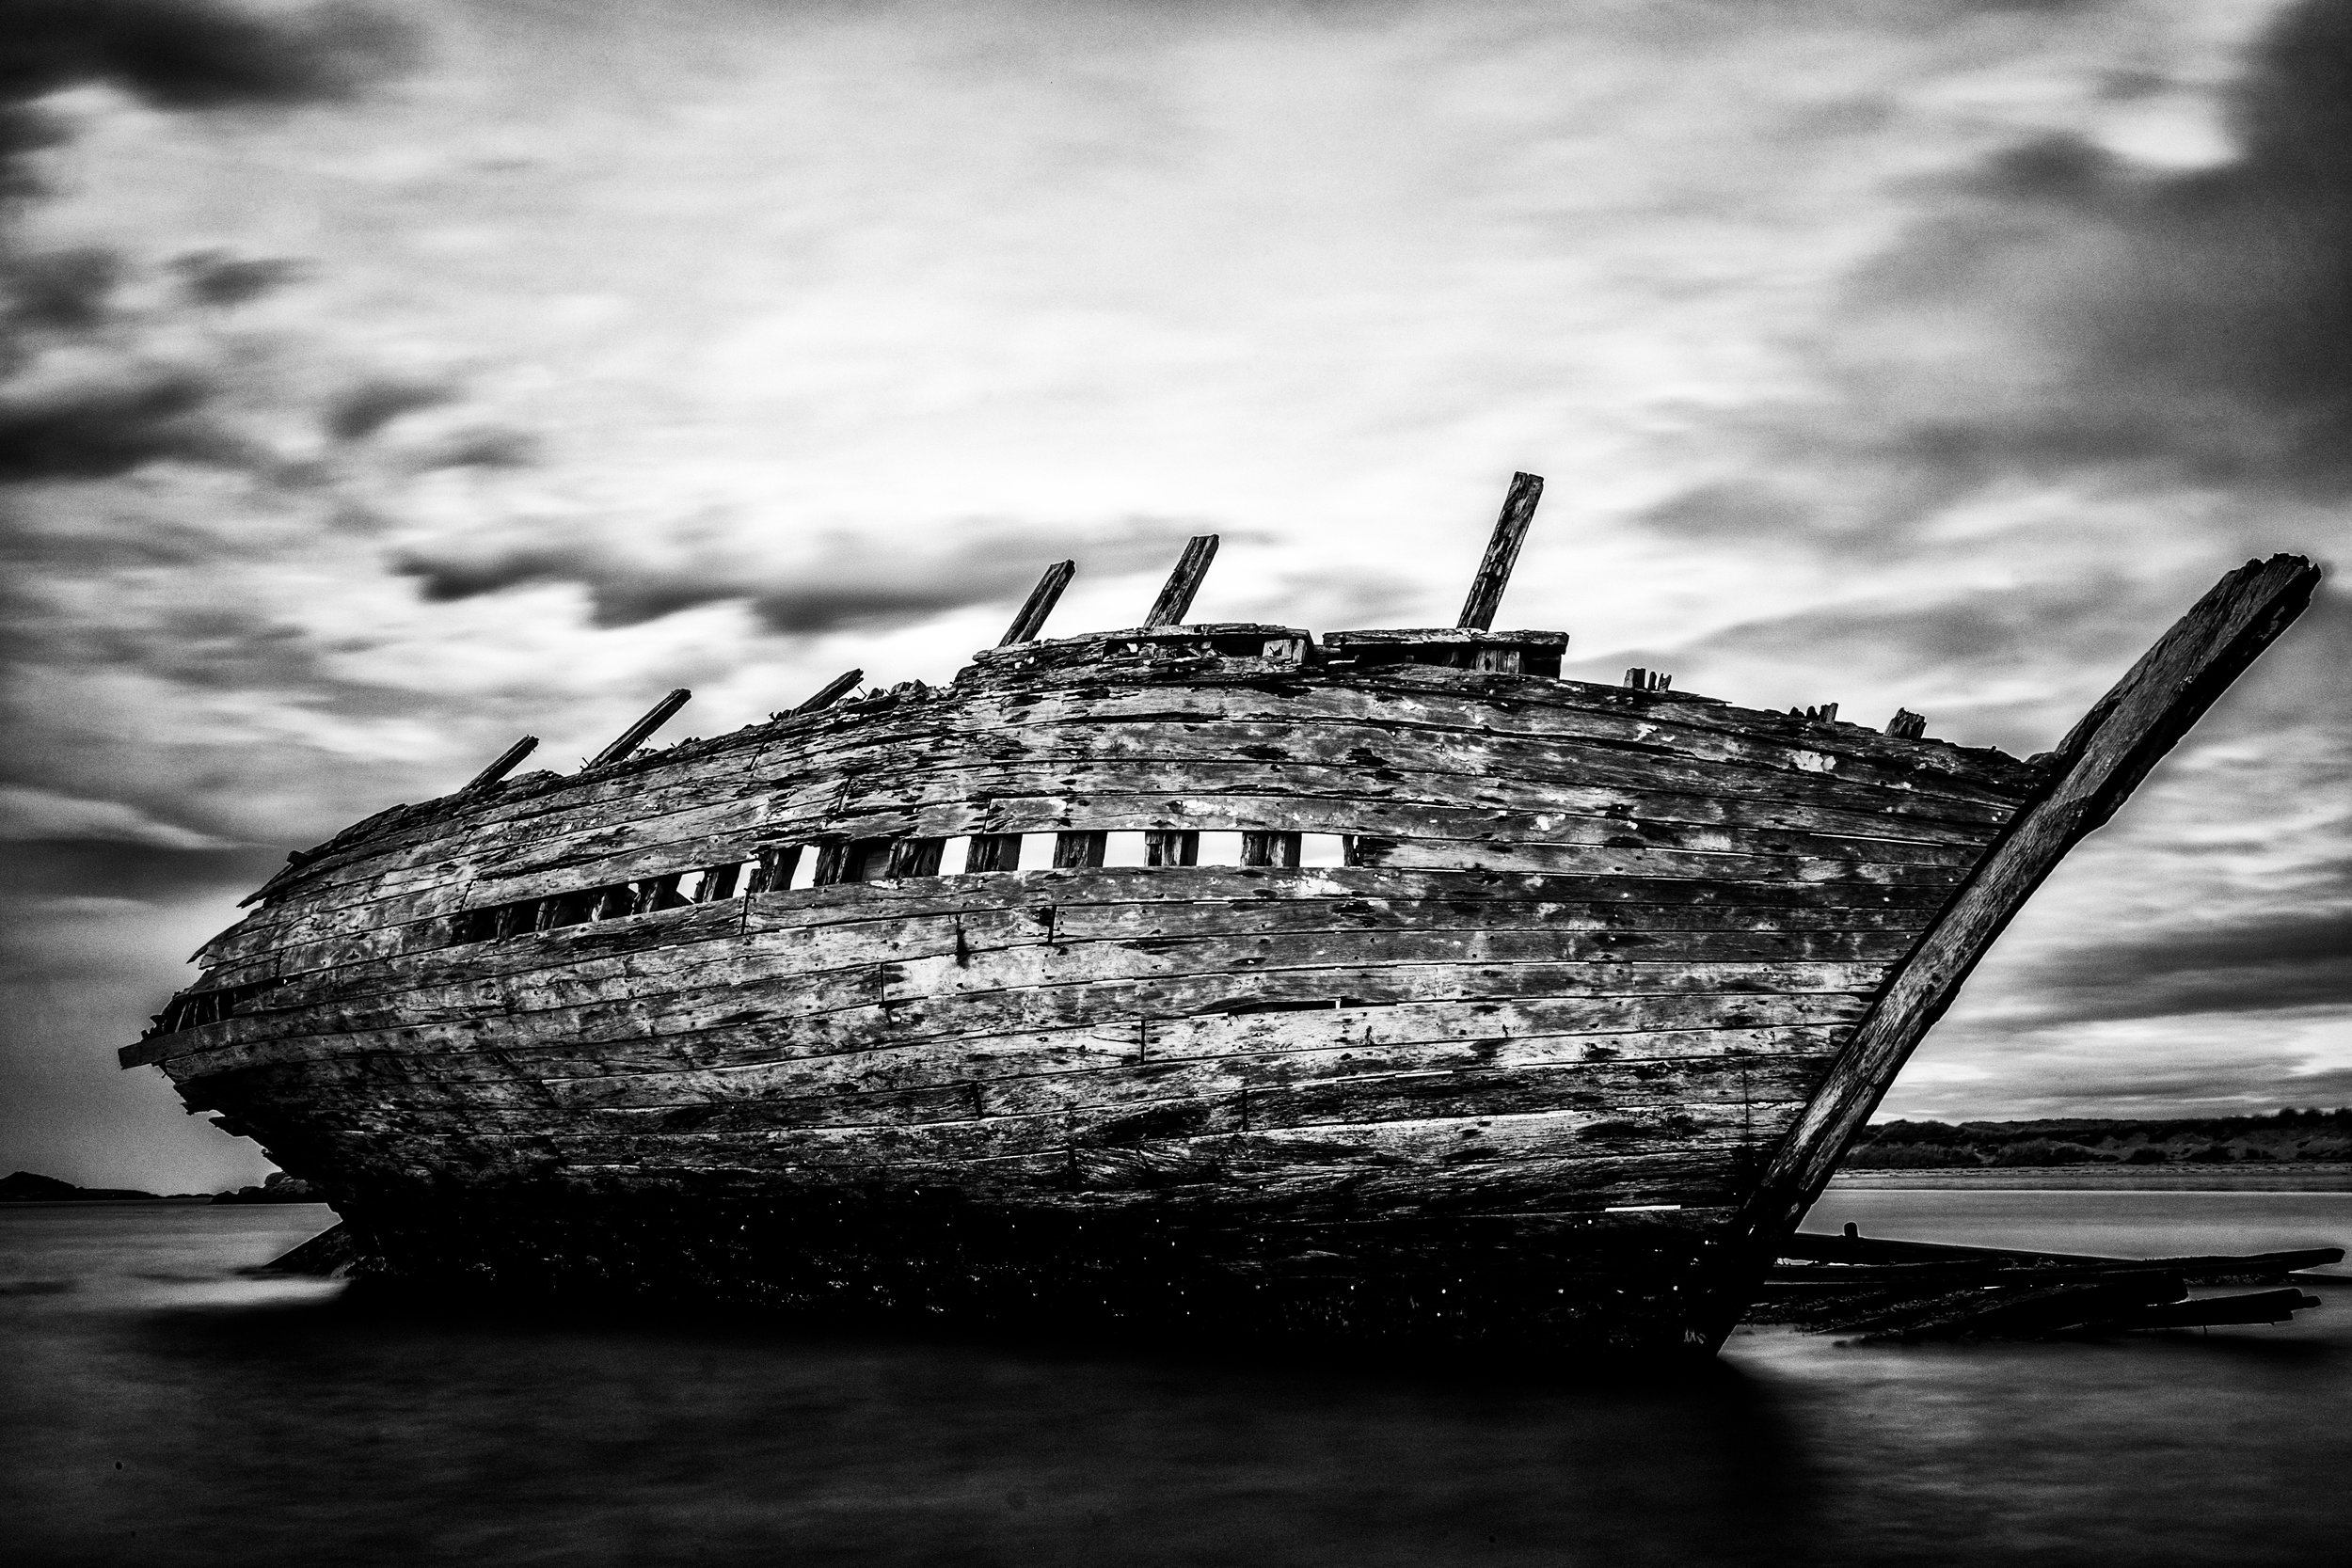
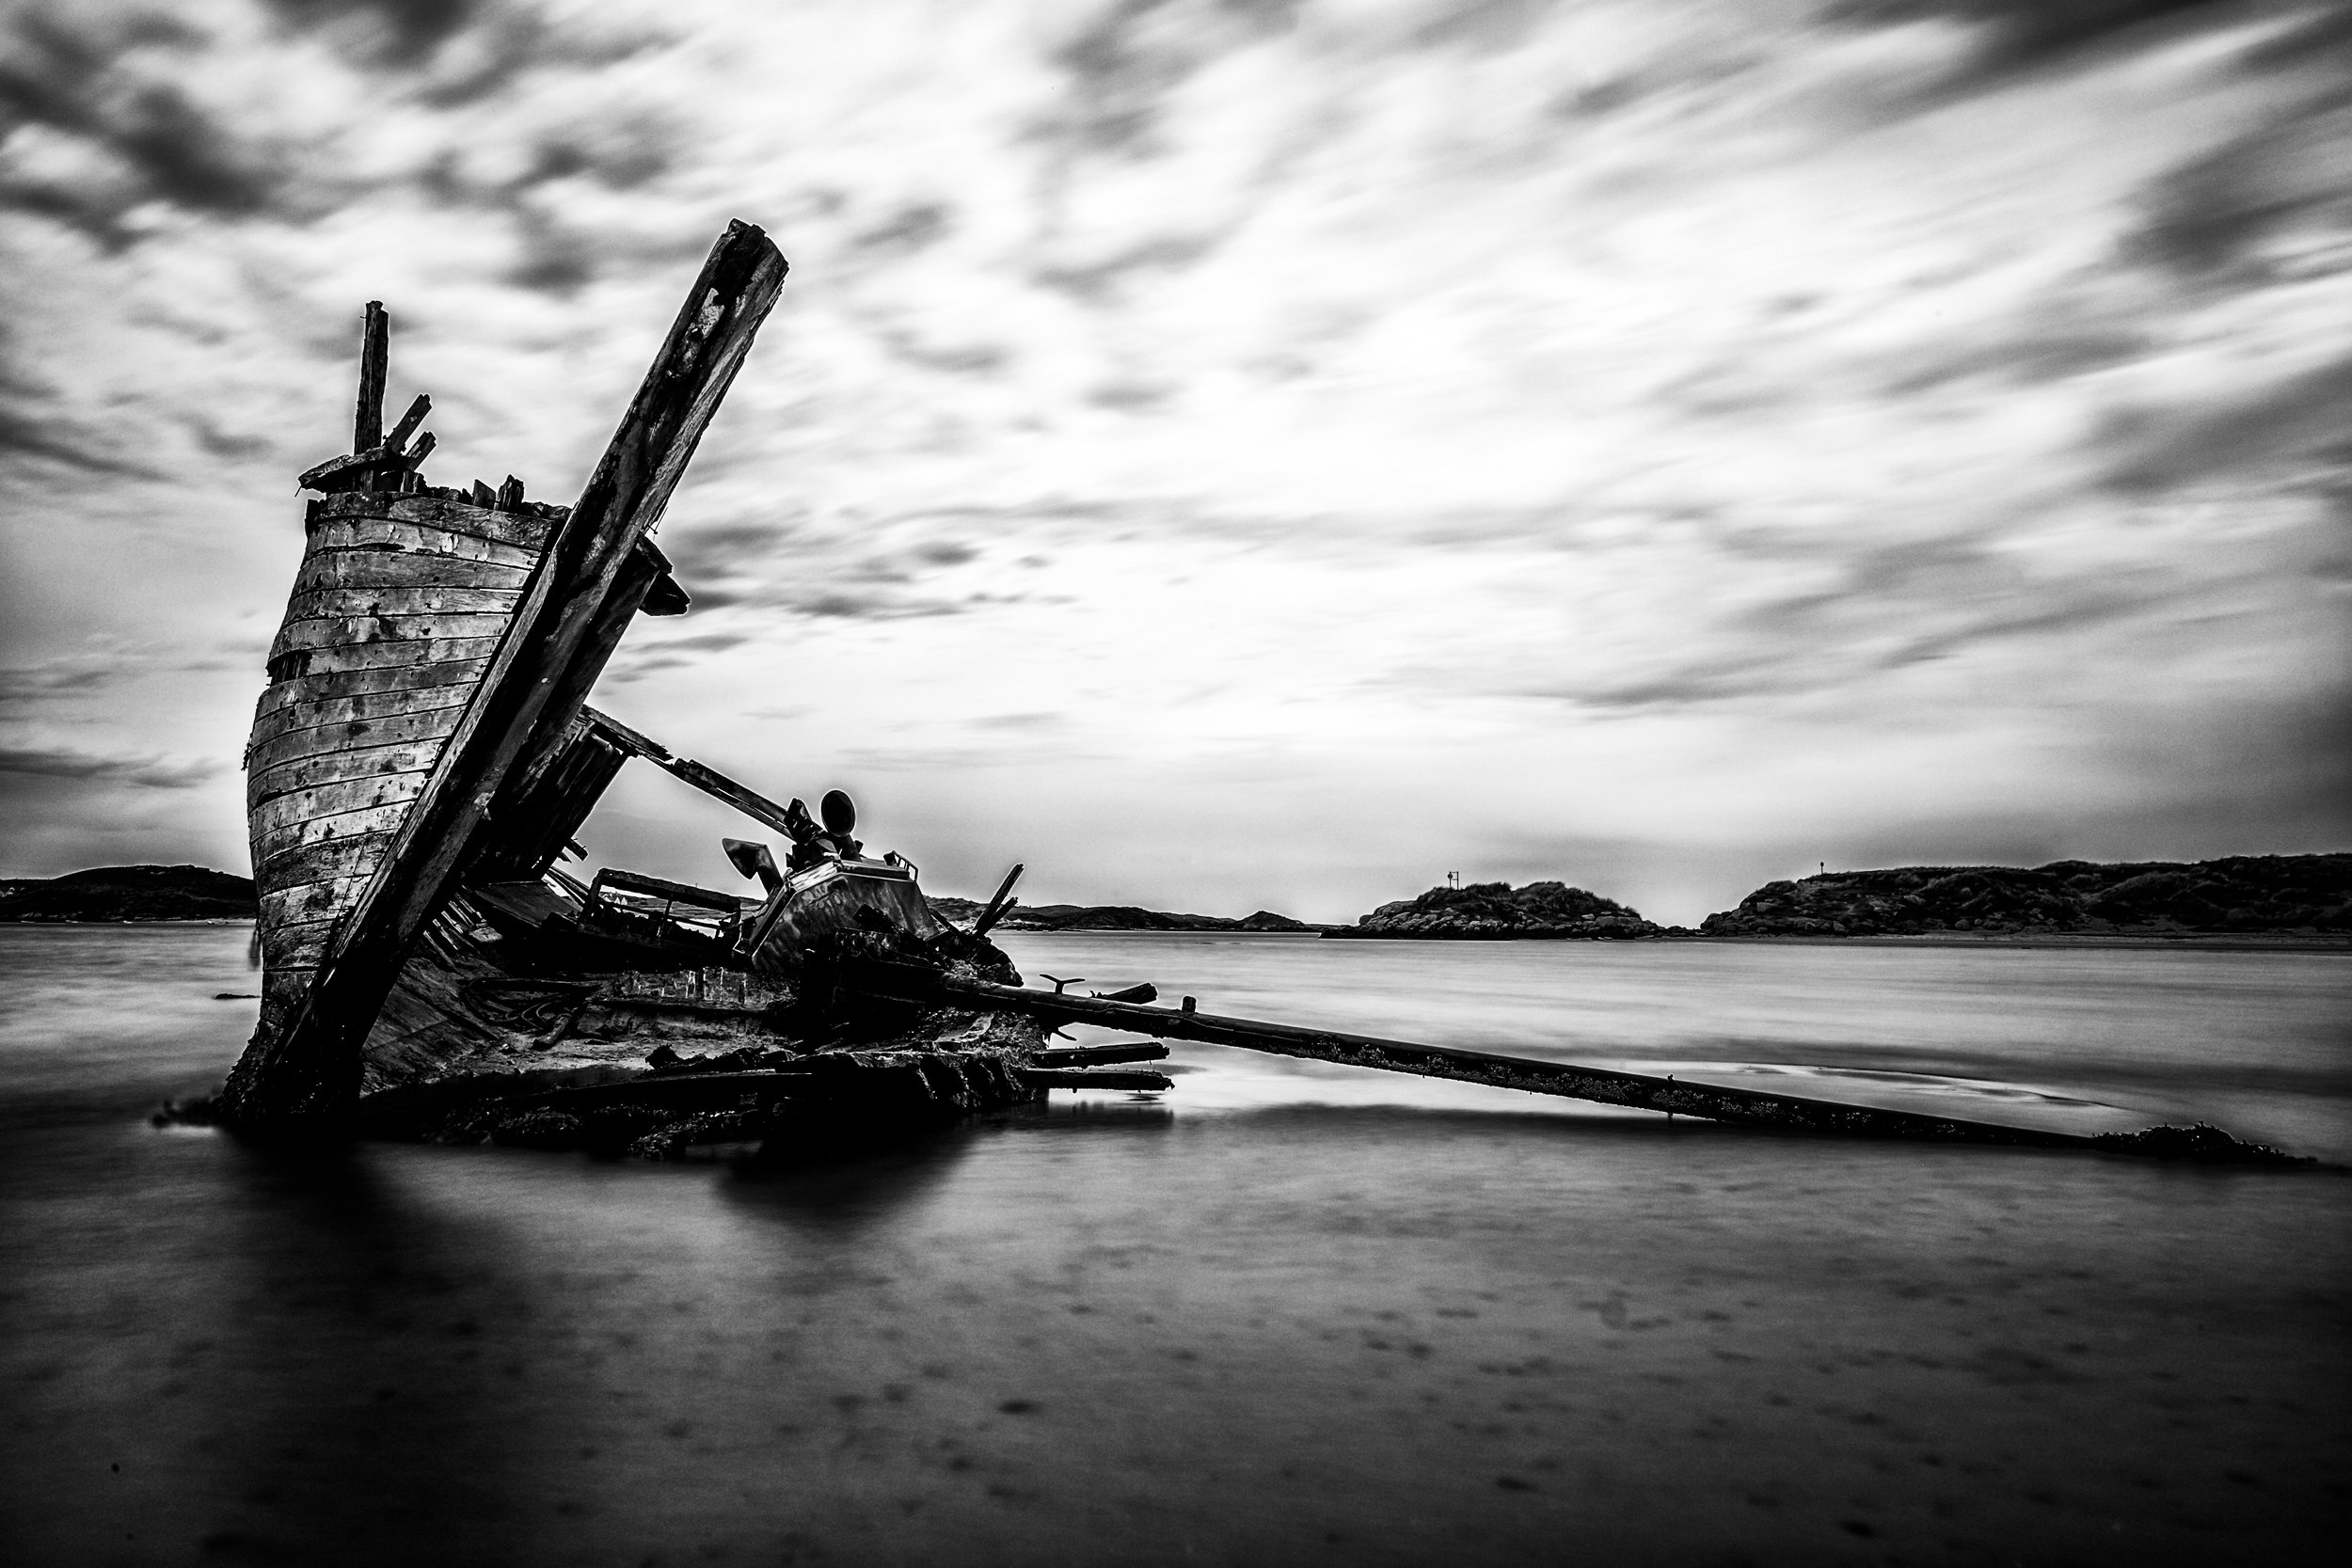
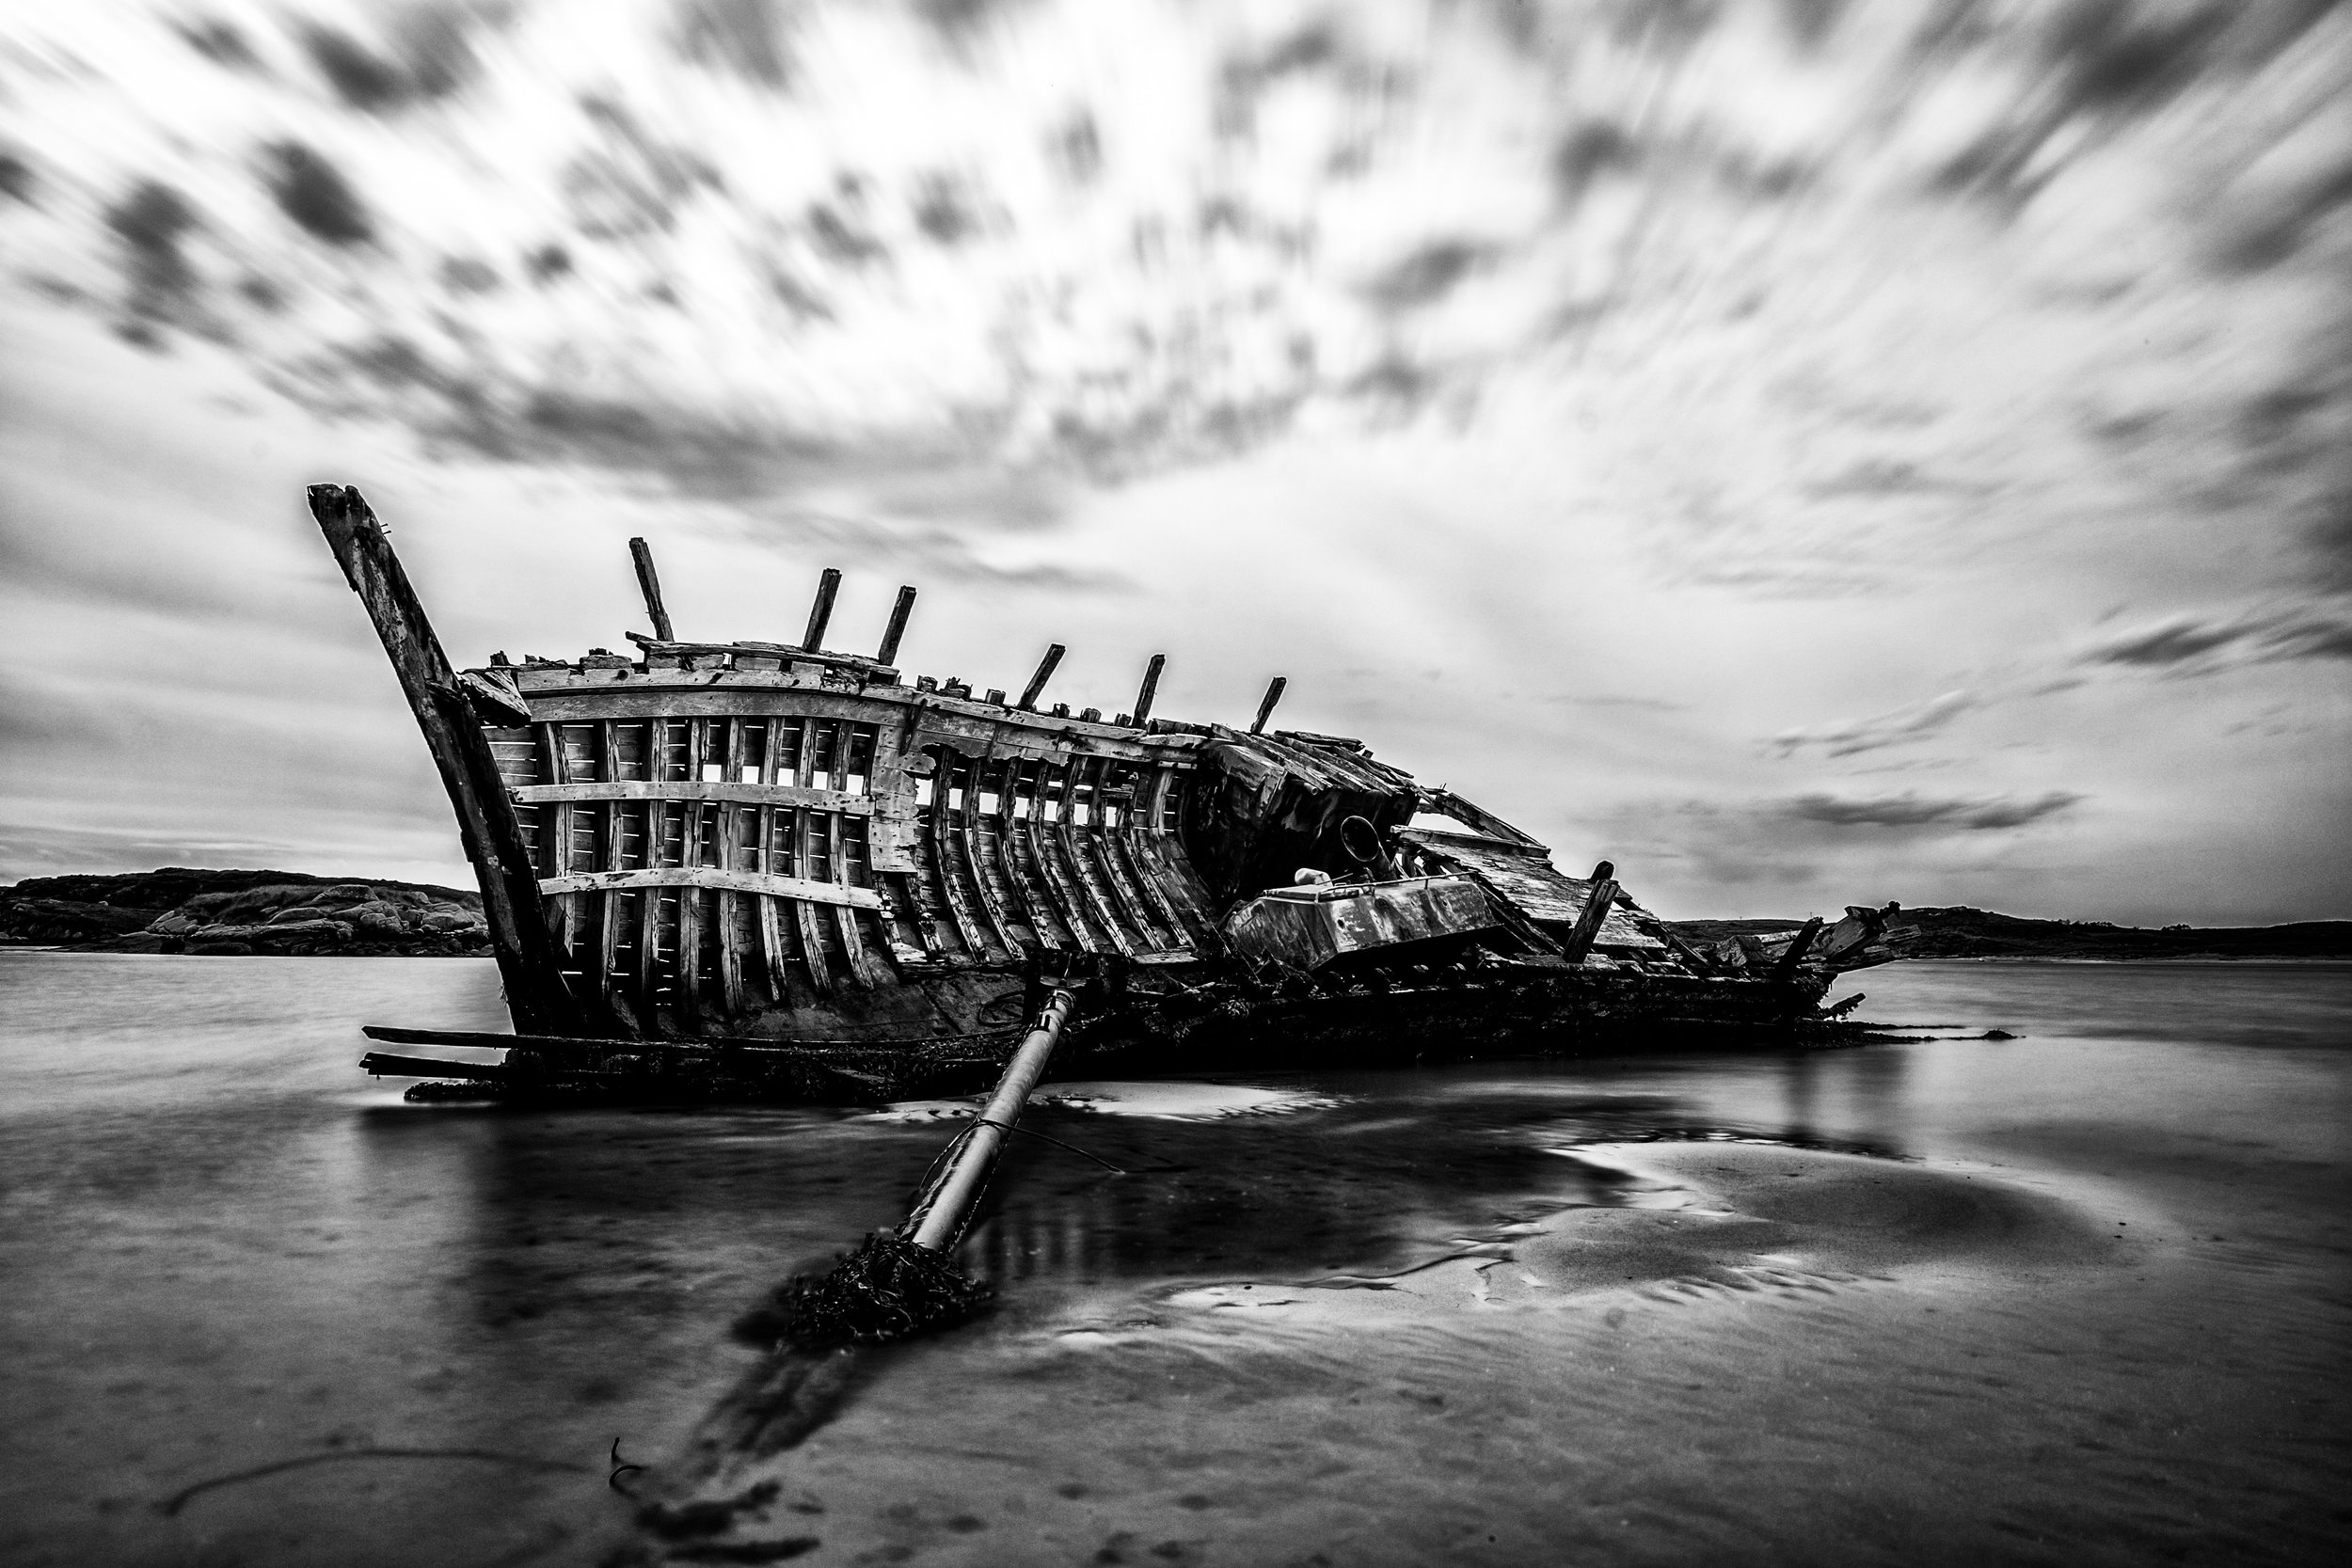
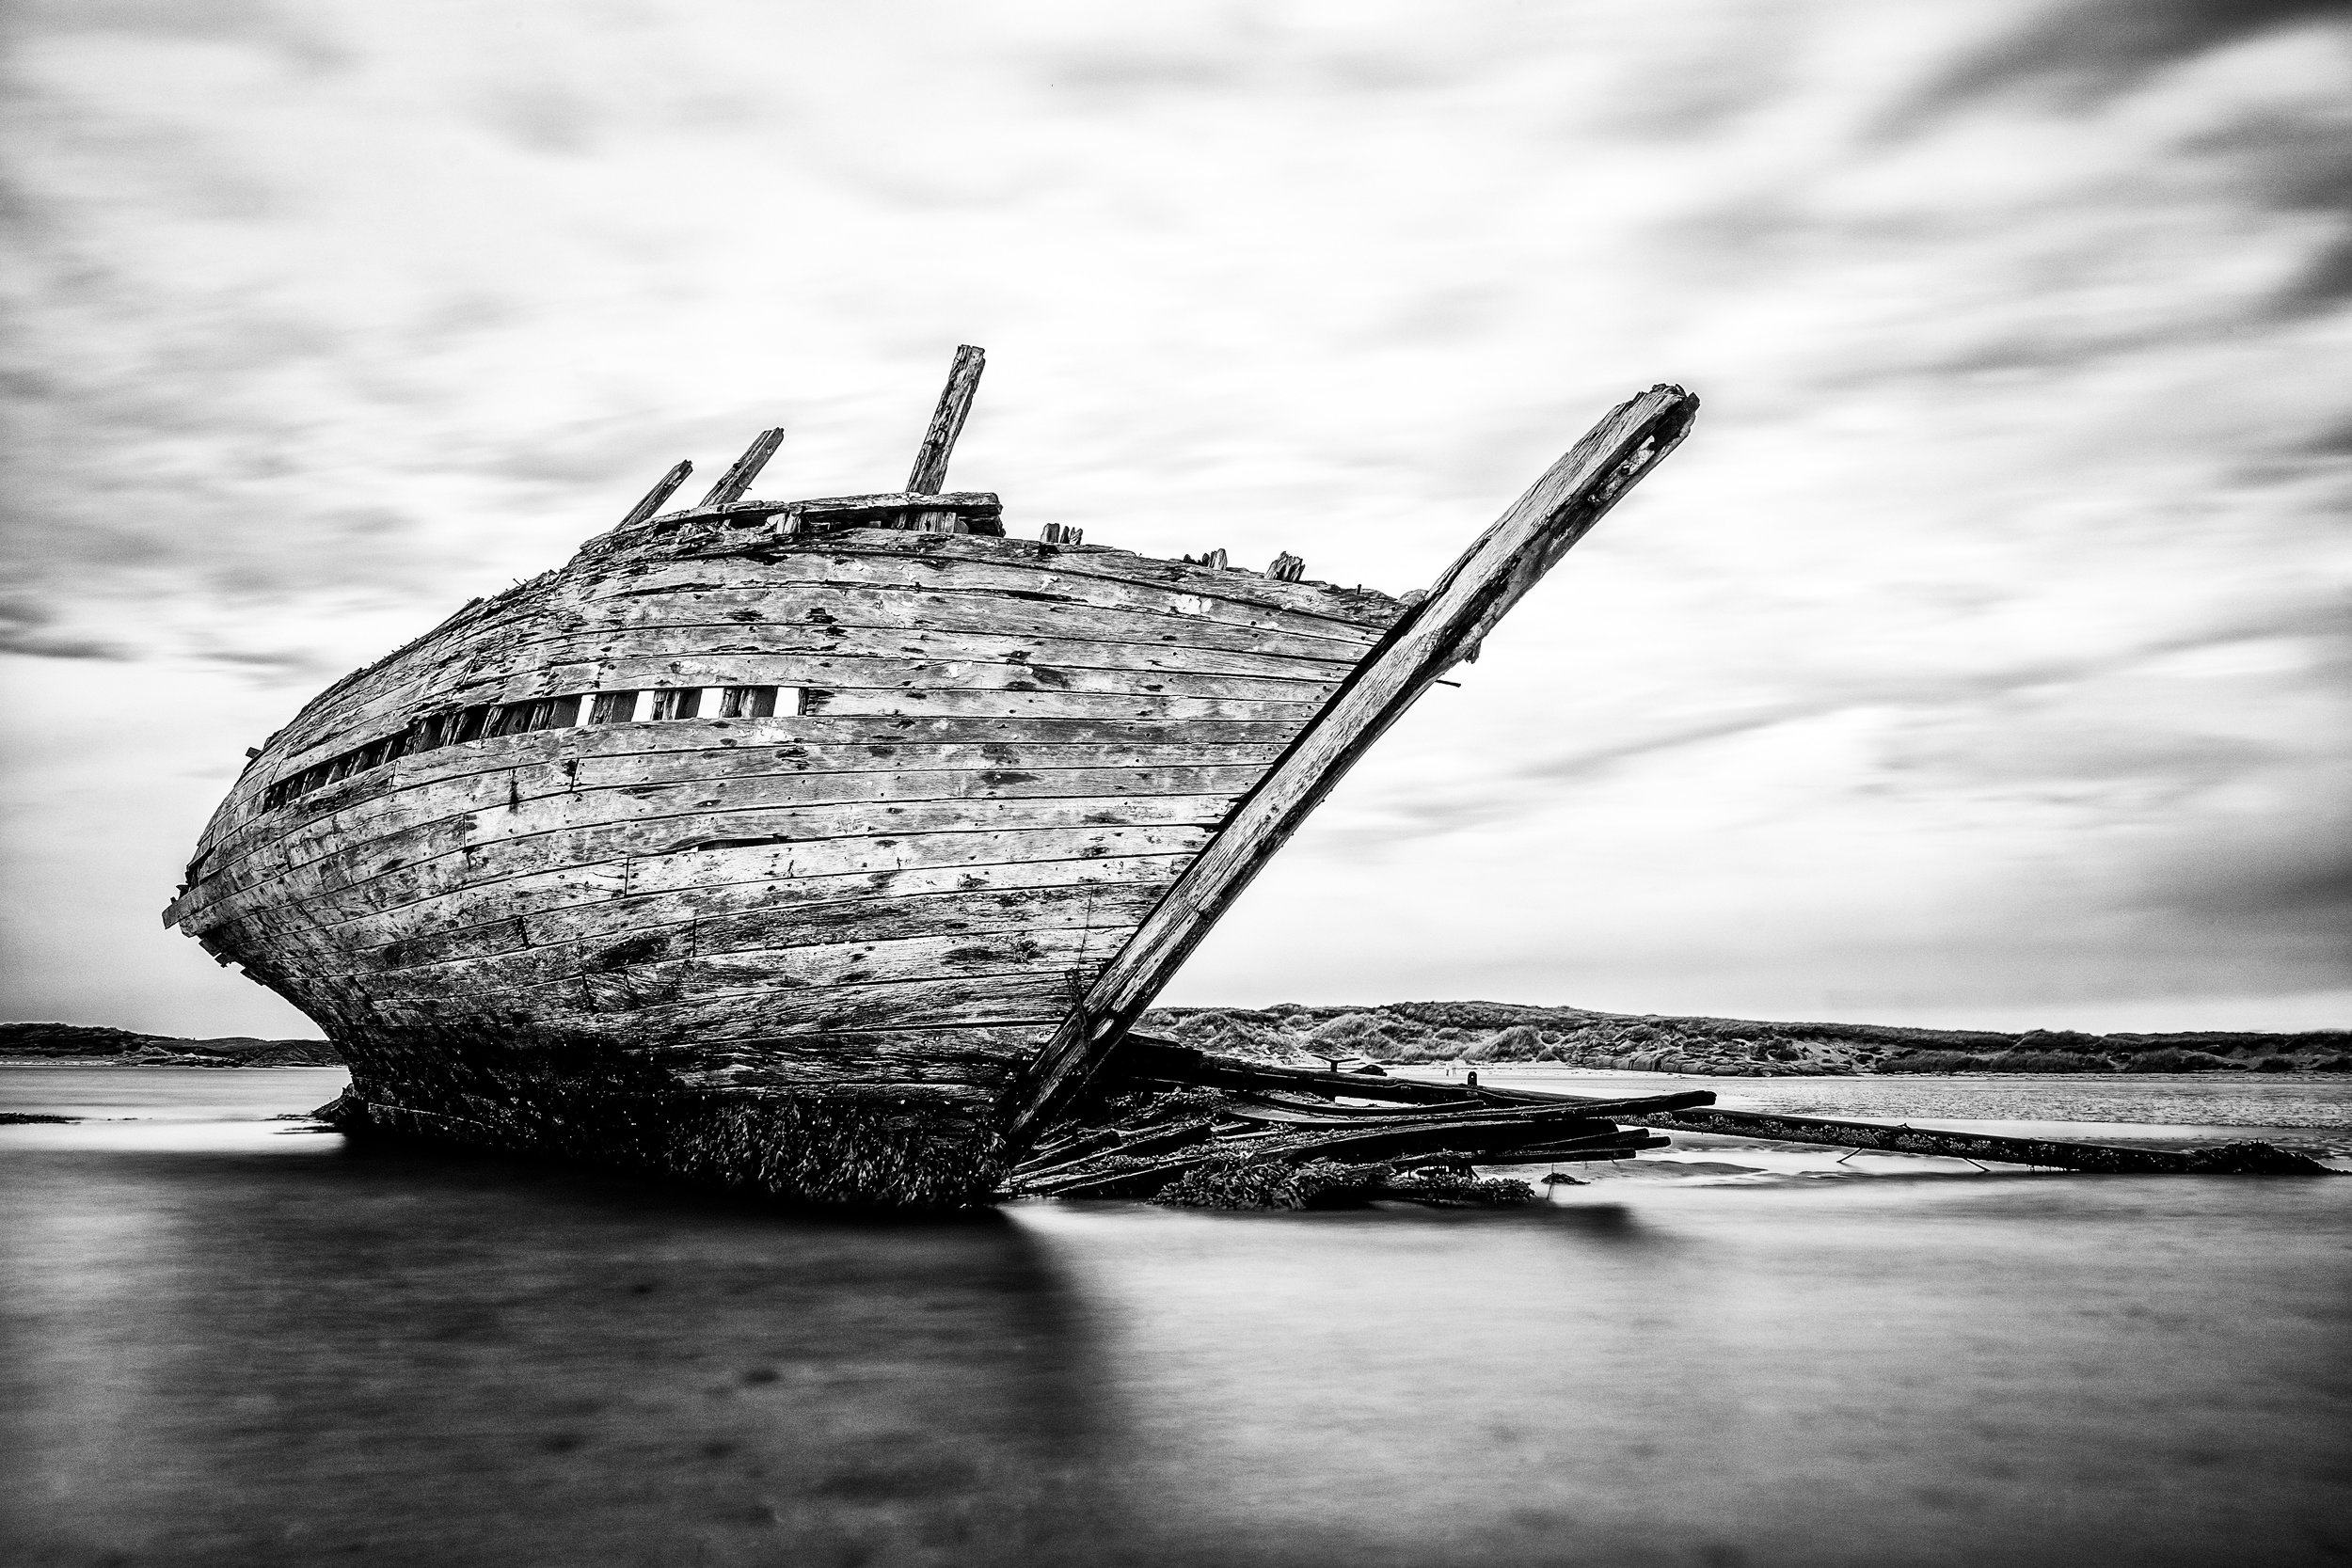
So far, for me, I'm finding that Luminar works for me when I'm pushing for a more heavily processed, dramatic style. Maybe that's because I'm still getting used to some of the sliders, but I find it's quite easy to dial up the drama, and when an image is suited to that approach I think it's working quite nicely.

The other big area that's taking some adjusting for me is the approach in Luminar that you can mask everything. I'm still working with this to figure out what the best strategy is for this style. While previously working on this test image I'd masked individual filters. This time, I opted for a plan of making my global edits on one layer, then I added a separate layer for the filters to be applied to the sky and the water. I created a new layer and inverted the mask from the sky/water layer to address the buildings. Finally, I used the exposure filter on two separate layers for dodging (increased exposure) and burning (reduced exposure). For some reason, I was having issues with the dodge and burn filter, so this approach worked better in this image. Personally, I've not been too fond of the dodge and burn layer as I'm not sure I like the method of just painting with lighter or darker, I prefer the approach of painting in an adjustment but still having control of the adjustment after I've done that work. But there are lots of ways to get to the same result.

Talking about adjustments brings me to one other area with which I'm still getting used. On the one hand, the ability to mask any filter (either on its own or as a layer mask) is immensely powerful, but sometimes I just want the simplicity of Lightroom's adjustment brush. If I just want to pop a bit of exposure into an area or paint in some warmth, I find the adjustment brush to be a bit more intuitive. With Luminar I'm still thinking about what filter do I want to use, then should this be a separate layer? It's very powerful, but it's not second nature to me yet. I suspect that's more the type of thing that will come with time.

The one feature I'm still waiting to see in Luminar is how the organisation feature will work. I like that Luminar can work with a non-destructive workflow, but it still processes the image on reopening, and this is one area where I feel that Lightroom has a better experience. If I've developed an image previously, then I don't end up with a very noticeable delay in opening up the develop module for that image. The organisation feature is coming in 2018 for Luminar, so I'll be interested to see how this works for a cataloguing workflow. I'm not convinced I need to switch away from Lightroom, and Luminar integrates into that workflow well anyway, but I'd like to consider my options.

The Edit: Peggy's Cove, Part 2 by Andrew Dacey

The final edited image

Introduction

In part 1 of this series on my edit for my recent Peggy's Cove image, I showed how the original unedited raw file looked on import and what I adjusted globally within Lightroom. That had the image well on its way to looking good, but I felt that there was still more I could do to take it to the next level. First I performed a couple of local adjustments within Lightroom, and then I finished the image in Photoshop.

The graduated filter, with overlay shown in order to show what areas I painted away from the filter.

Graduated Filter

I wanted to add some drama to the sky in this image, so I used the graduated filter to perform several adjustments. I wanted to accentuate the warm-cool look, so I shifted the white balance slightly cooler and adjusted the tint toward magenta. While these values are only -6 and +2 respectively, a little goes a long way when it comes to the local adjustment settings for white balance.

I remember that I tried darkening the sky with negative exposure, but wasn't happy with the results. Instead, I reduced the shadows and the blacks while increasing the contrast and saturation. This change made the clouds much more ominous while maintaining the brighter parts. As you can see in the screenshot, I pulled the filter quite far into the image, but then I used the brush to mask out the parts of the image I didn't want to be impacted. The masking brush is a fairly recent feature in Lightroom, and it makes the graduated filter even more useful.

Again, I've turned on the overlay so that you can see what areas were hit with the brush to accentuate the warm light near the horizon.

Brush

The graduated filter did a lot to help the sky, but I wanted to highlight the warm sunlight even more, and I used the brush to achieve that. In this case, I just used a bit of a warmer white balance and some extra saturation. It may look like I'm using a relatively high setting on the white balance, but this is in the same area that was already being cooled by the graduated filter, so I had to use a higher setting to bring back the warmth along the horizon.

The image after all Lightroom edits were applied.

Photoshop

After completing the local adjustments, I was feeling quite happy with the image, but I knew that there were still a few things I wanted to clean up. I initially attempted cleaning up the distracting spots in the water with the spot healing tool in Lightroom, but there were just too many of them, and it wasn't practical to do it in Lightroom. I opened the image as a smart object in Photoshop and then used the spot healing brush in Photoshop, with content aware fill to clean up the spots. I almost always send my files to Photoshop as a smart object so that I can get back into camera raw and modify those settings if I want to. Sometimes after making further adjustments in Photoshop, I'll see something that I need to change in the raw file adjustments, and this saves me a trip back into Lightroom. I performed the healing on a separate layer so that I could maintain a non-destructive workflow.

The image after cleaning up the distracting elements in the water and cropping.

After completing the healing, I decided to crop the image to cut out some of the distracting seaweed at the bottom of the image. I'd tried cloning it out, but it was proving time-consuming, and I didn't feel like I was losing much by cropping it out. You do get a little less of the reflections in the water, but I felt this was an acceptable compromise in this case.

A reminder of what the original raw image looked like on import.

I created a new smart object from the healing layer and the raw file's smart object. Having one smart object of all of my combined edits allowed me to apply smart filters to the entire image. It can get a little confusing with nesting objects like this, but I find the extra flexibility to be quite valuable. I used Macphun's Intensify CK to apply effects to the whole image; Detail Extractor and Landscape Enhancer. Unfortunately, this is one aspect I can't show in this tutorial. While Intensify can be applied as a smart filter, it doesn't work correctly. I've reported this as a bug to Macphun. It will look like the smart filter is applied, but if you edit your smart object, or otherwise try to modify the smart filter settings, you'll lose whatever effects were previously applied. I do remember that I reduced the opacity for both layers, I think one was 40% while the other was 70%. Apparently, only Luminar and Tonality currently support being used as a smart filter. I've briefly tried out Luminar but haven't quite warmed to it yet. At some point, I'm planning to try recreating some of my favourite images in Luminar, or Tonality if they're a black and white, to get smart filters working properly and to update them to the newer software.

The Edit: Peggy's Cove, Part 1 by Andrew Dacey

The finished image for my Peggy's Cove image

Introduction

I've been wanting to write a blog post walking through my editing process for some time now. It's evolved quite a bit since my last posts that walked through some of my edits, which were from several years ago.

My recent trip back to Nova Scotia wasn't predominantly aimed at photography, but I did make an effort to pack a bit of gear. Usually, if I'm just casually travelling, I'll pack one Fuji X-T1 and one or two lenses at the most. For this trip, I packed the one body and the 18-55mm kit lens (which for a kit lens, is shockingly good), as well as my MeFOTO Roundtrip tripod and my Lee Seven filters. The camera and kit lens has become a typical "walk-around" setup for me, and the tripod and filters didn't add much extra heft at all.

Capture

I grew up in Nova Scotia and had family that lived near Peggy's Cove, it's always been a favourite area for me, and one I've wanted to shoot more of as I've gotten more serious about my photography and improved my landscape skills. Unfortunately, the area of the lighthouse is horribly touristy and is typically overrun most days. However, if you just go slightly away from the lighthouse, there are still tons of great areas to shoot that are much less crowded. I was travelling with my mother and my girlfriend and noticed the light and clouds in this spot. We didn't have a lot of time, so this had to be a quick setup. I knew I wanted to use an ND filter to smooth out the water; I tried with the 3-stop filter first but saw my exposure wouldn't be long enough, so I moved up to the Little Stopper 6-stop filter to get a 2-second exposure at f-11.

The original raw image with no edits.

Global Edits

I'm currently using Lightroom for editing all of my raw images. The initial import was quite flat and dull, which is typical for raw photos. It's worth noting that I do apply some of the edits I'm about to describe as a preset during the import process. I never actually saw the image as it appears in this post, but I thought it was worth sharing the unedited original image just to show the full before and after  I think this also highlights why it can be worth creating some good presets that get you into the ballpark and apply them on import. I could have easily looked right past this image if I'd seen it in its original form.

The specific Lightroom settings I used for my global settings.

I've been following some of the advice from Serge Ramelli's landscape classes and now start with dragging highlights down to -100 and shadows up to +100. My preset also adds quite a bit of clarity and vibrancy into the image, which I dial back on the saturation a bit to keep things from getting a little too garish. I always manually set the white and black points to my liking for the particular image. I will play with the vibrancy, and clarity for individual images but this is a great starting point. The final thing I do for my landscape preset is that I set the camera profile to Velvia, this is a profile for Fuji cameras, and it does help get the classic look of Fuji Velvia film. The other obvious thing that needed adjusting was the white balance. I typically leave my camera on the cloudy preset since I can always adjust it in the raw image later and this is a decent starting point. Especially with long exposure shots though, I find the filter creates quite a noticeable blue colour cast, and you do have to adjust this. I wanted to highlight the warmth of the beginning sunset, so I went for a relatively warm starting point.

My sharpening settings.

The other step I took was to adjust the sharpening. Again, I add my baseline sharpening settings in my preset, so mostly this is just tweaking things a bit. I use a relatively high sharpening value, but then control where it's applied by using adjusting the masking This allows me to add in extra sharpening where I want it while eliminating it from large open areas such as skies or water, where it would be distracting.

That was all I did on a global level. For a lot of images, that's all I do to the image. I picked this particular image because I did a much heavier edit than normal, so it made for a much more detailed demonstration of what I'll do to an image that merits a more in-depth edit.

The results after applying my global edits.

I've decided to split this post up into two parts to keep the length down. Next time I'll discuss the local adjustments I performed in Lightroom, as well as covering the finishing touches I made in Photoshop. I hope this has been useful to some of my readers. Please leave a comment on this post if you'd like to see more posts like this in the future.

Donegal: Bád Eddie by Andrew Dacey

I'm experimenting here a bit with how to best show off sets of images on the blog. I think the slideshow option might be nice for a series, but I'm curious what people think and whether it would be better to allow for full-screen viewing of the images. What I do like about having the slideshow is that it at least presents one big image when you first load the page, which I think is a bit more eye-catching than just having a block of thumbnails.

Continuing on here with my idea of stories, I'm at least looking at logical image sequences that I can present on my blog. Obviously, this is a set of images all exploring this one wrecked boat. In this case, this would be Bád Eddie (or Eddie's Boat), at An Bun Baeg, Ireland.

The boat apparently ran aground in the 70s and has been there ever since. It's really starting to deteriorate now, and it's unclear how much longer it will remain. We visited in the morning to catch the low tide. We were able to get quite close on the sand and it was only toward the end of the visit that the water began to come in. It was really nice having the opportunity to explore the compositions both with the sand and with the water. With a group of photographers, we did have to be a bit careful to stay out of each other's shots and to be aware of leaving footprints, but everyone was quite cooperative and we did a good job of waiting to confirm that everyone was done with further away shots before approaching closer.

In the interests of full disclosure, there were some warning signs on the boat to not climb on top of the boat, I found them distracting and I've removed them. Given that I'm going for a more artistic rendition here, rather than strictly documentary, I don't feel that this is a problem.

Telling stories by Andrew Dacey

Dunlewey Church, Poisoned Glen, Ireland.

I like this image, it's not the best from my trip to Donegal, Ireland, but I'm still quite fond of it. I love old buildings like this. I think this works as a single image, but I'm not really sure it tells much of a story. Maybe it's more shots of the same church, maybe it's building up a collection of abandoned buildings or abandoned churches. There's something here I think, but it's not quite there yet.

One of the more common pieces of advice you'll see regarding how to improve your photography, once you get beyond the basics of technical advice, is to create images that tell a story, either as a single image or in a series of images such as a photo essay.

I absolutely love telling stories. If you get me talking it's often hard to get me to stop rambling about some type of story. I'll even recount friends' stories to others. I love reading novels and getting immersed in the story that the author has woven. I've often dreamt of writing a novel and sharing my stories with others.

When it comes to my writing I tend to have a very strong sense of the visual in my mind, and the struggle I have is conveying those visuals into words. What's unusual, is that for some reason I have a huge block when it comes to working in the other direction. For whatever reason, my brain seems to segregate stories into words whereas when I'm working with photos I'm purely thinking about the visual and how to compose an image.

I think there are two ways forward. First, I should work on my writing more often. I'm trying to write more blog posts on this site, and some of my other sites. Given how important writing is to me, it seems like this is a skill I should work on developing more. Meanwhile, on the image side of things I think I need to start exposing myself to more visual stories, either looking at single images that tell a strong story or looking at photo essays that resonate with me. I think this is one area that I've been somewhat lacking in, I don't have a lot of good role models in this space in terms of what I want to emulate. Then in the longer-term I should start looking for opportunities to try to tell my own stories in a visual way, either just with images, or with a mix of photos and words.

Updated design by Andrew Dacey

To go along with my recent updating of the galleries on this site I also wanted to update the look and feel. I was quite surprised to see that I'd not really changed the look of my site for 6 years and it was really starting to look a bit dated.

The biggest thing I'd wanted to change was the side navigation. It just felt like it was eating up way too much space, and competing for space with my photos. The new design has a much cleaner look overall and I'm quite happy with it.

It's been a very quick change in templates with only a few tweaks so I'm hoping that I've not broken anything. If you do stumble across any content that's not working please let me know.

Updated galleries by Andrew Dacey

Murder Hole Beach, Donegal, Ireland. Probably the best shot I took on the photo tour.

I've finally gone through the process of updating the galleries on this site. I've always intended for the two galleries to be a bit of a portfolio for me and to showcase the best of my work. For a long time though, I wasn't producing anything new. The last year, I went on a week long photo tour in Donegal, Ireland and raised the bar on my landscape shots. I'd long known that my "rural" gallery was somewhat lacking in quality and in the number of images I felt worth showing. After that trip, I'd been planning to at least update the rural set of images but hadn't gotten around to it. After some more shooting on trips, and producing more content that I wanted to share, I felt like it was finally time to push the latest stuff up there.

I'm quite pleased to have ten images in both galleries that I'd happily show. I think I'm doing far more to showcase my best work now. In particular, the rural gallery has seen a complete replacement, with ten new images and nothing from the old gallery making the cut. The urban gallery was less of an extensive overhaul, as there's still some favourite images in that gallery and I've not been shooting as much urban or street photography, but I have added a few shots also from the last year.

I'd love to promise that I'm going to keep the blog up on a more regular basis. It really is something I'd like to maintain, but I'm finding it difficult to post content regularly. I have some ideas for showing some tutorials on how I've worked on some of my images, and possibly discussing the making of some of the images, but I really don't want to make any promises at this point.

The other "big" change has been that I've finally jumped on board Instagram. I've added the social link to my site and removed Pinterest as I was never posting anything there and was only using it for inspiration.

Are you a maximizer when it comes to photography? by Andrew Dacey

I've been reading The Happiness Project by Gretchen Rubin and last night I finished off the July chapter which focused on money. In that chapter there was a section which talked about 2 different styles of decision-making processes for buying; what Gretchen refers to as a "satisficer" as opposed to a "maximizer":

Satisficers (yes, satisficers) are those who make a decision or take action once their criteria are met. That doesn't mean they'll settle for mediocrity; their criteria can be very high, but as soon as they find the hotel, the pasta sauce, or the business card that has the qualities they want, they're satisfied. Maximizers want to make the optimal decision. Even if they see a bicycle or a backpack that meets their requirements, they can't make a decision until after they've examined every option, so they can make the best possible choice.

In reading the description of the maximizer I burst out laughing because it described me to a tee. My girlfriend had read the book before me and I asked her if she thought the same thing and she nodded vigorously as I read aloud that description. I like to make informed decisions, I like to know about the things I'm going to purchase before I purchase them. Now just said like that it doesn't sound too unreasonable, but I tend to take it to extremes. I'll spend months doing research deliberating over the pros and cons of different choices, I'll do extensive online searches for information, I'll pour over reviews, I'll try to check out each option in person (sometimes more than once). How bad can it get? A few years ago when I was thinking about buying a barbecue I got to the point where I was reading through reviews on a charcoal review site.

After I put down the book for the night I started thinking that maybe I'm a maximizer in other parts of my life too. I've been spending a lot of time trying to figure out what's been holding me back in pursuing my photography more seriously and I think this is a big part of it. I'm a geek by nature anyway so it's not too surprising that I lust over all sorts of expensive photo gear and it's really easy to say to myself that I need "the best" gear. I also spend an tremendous amount of time reading photo books, watching online training videos and listening to photography podcasts all in order to learn more about photography. While the learning is great and I've certainly expanded my knowledge I'm not applying it, am I waiting for some magic point where I "know it all"?

Taking it further, I struggle a lot with expressing what my vision is and finding my voice, both photographically and even with this site. I don't post as often on the blog because I haven't figured out what I should be talking about. I don't shoot as often as I should because I haven't figured out what I should be shooting. I don't pursue paid photography work because I don't know what paid work I should be pursuing. As a "maximizer" this becomes paralysing because I'm used to not making a decision before I've weighed all the options. What I need to do is remind myself that none of these things have to be permanent decisions and that I may just have to be willing to try something and then change directions if that doesn't work because waiting until I figure it all out may mean that I never figure it all out.

Looking online I'd say there's a lot more people like me out there. Browse any photo site or forum and you'll find tons of people spending hours upon hours of time debating every technical aspect, which camera is "better", what's the "best" lens, which camera has the lowest noise at high ISOs, etc, etc, etc. Instead of going out there and shooting with the equipment we do have we chose to sit in front of our computers in the never-ending search for that best possible choice instead of being satisfied with what we have, which more than likely meats all of our criteria.

2012 Challenge - Make it cost by Andrew Dacey

Okay, I'm a little late on posting this. I had the idea just before New Years but then I let other things keep me from posting this a little earlier. I started even second-guessing myself about posting it at this point but the entire goal of this post is to challenge myself for the upcoming year and to hopefully inspire others to do the same. The other important piece of this is that this is about setting goals and challenging yourself and while New Year's is a typical time for doing this there's absolutely no reason why you can't start at any time in the year with any time frame that works for you. I've been thinking a lot about what I want to achieve photographically in 2012 and really it all kept coming back to the idea that I want to shoot more often. The other piece of this was I wanted to make sure to give myself a strong incentive to follow through with this goal. Last year while attending Dane Sander's Fasttrack Photographer workshop Dane talked about when change happens and what it takes for it to happen. One of the pieces for making change happen that he talked about is what is it going to cost you. If the status quo isn't costing you anything then you're not going to change. This is often where New Year's resolutions fall apart, how often do you make a resolution and even while making it know that you're not going to keep it?

I knew that I wanted to shoot more but I needed to come up with something more specific that I could measure. In the end I decided to settle on the number of shoots that I'd do in 2012. I didn't shoot very often in 2011 so this is a good measure for me. I've decided to aim for 15 shoots in 2012. Now to clarify, what I mean by a "shoot" is not simply going out for an afternoon shooting but I mean something where I've come up with a specific concept and then shot that concept. Alternatively, if someone is paying me to shoot something then that session will count as a "shoot". 15 may sound low to some people but by that criteria I only did 1 or 2 shoots all of last year so this is a big increase. I also have a full-time day job so I'm most likely going to be limited to evenings and weekends for this unless I take time off.

So with my goal covered the next thing was to come up with a cost for this, what was failing going to cost me? I decided to go for the "all or nothing" approach. If I fail in this goal this year I will be giving away all of my camera gear. Should I fail I will setup some type of contest for determining who will receive my Nikon D700, 24-70 f/2.8, 50mm f/1.4 and any other equipment I currently have or may acquire this year. Basically I'm saying that if I can't make shooting a priority in my life then shooting won't be in my life.

Now obviously this is a contest which I have no intention in having to follow through with but the point is this is creating a motivation for me to get out there and shoot more often. To get 15 shoots done this year I'm going to have to average at least 1 a month and then manage to swing 2 shoots a month at least 3 times to make up the goal. I hope to post status updates throughout the year to keep you all apprised on how things are going and what challenges I'm facing.

Now for the inspiration part, I'd really like to put this challenge out to you as well. Are you willing to set some goals and make failing cost for you? What goals do you have, what will you make it cost? If you're willing to take up my challenge (and it doesn't even have to be photo-related) then I encourage you to share your goals publicly as well as what you'll do if you fail. To help track this I'm going to encourage people to share their stories on Twitter and Google+ using the hashtag #Makeitcost. I'm really hoping that I can inspire others to challenge themselves to do more great things and to stick to it. It doesn't matter what the goal is or what the cost is, but make it something that will challenge yourself and that costs enough that you won't want to fail.

Incidentally, you can follow me on Twitter at @AndrewDacey and on Google+as Andrew Dacey.

Shooting through a problem by Andrew Dacey

Back in October I flew down to Florida to attend the Vanelli and Friends Bahamas cruise photography workshop. I hope to have some more details about the workshop up soon but I wanted to share one of the images from the shoot as I'm really happy with the shot. However, I think it also helps illustrate some of my personal approach to dealing with problems you encounter while you're shooting. I've shot plenty of times in colder weather so I'm aware of the concerns about condensation when coming in from the cold. As many people can tell you, this also works in the other direction in hot and humid climates when going outside from an air conditioned space. I've shot in SE Asia before but when I was there I wasn't staying in heavily air conditioned rooms and it was also toward the end of the dry season so condensation wasn't much of a concern. Nassau, however, was a completely different matter and when I pulled my camera out of my bag it fogged up badly. When I put the camera up to my eye all I got was a huge amount of blur. As I mentioned, I'm more used to shooting in cold weather so I'm used to having my viewfinder fog up when I'm outside. I'll admit that at the time I mistakenly thought that it was just my viewfinder and LCD that were fogged up, it just didn't occur to me that the front element of my lens was fogged as well. Perhaps because of this, I simply didn't let it get me down and when I saw shots I took them, I just kept shooting through the problem. Because of this determination to just keep shooting in spite of being barely able to see what I was framing I took this shot.

As you can see, things are pretty fogged up (and this was after my lens had started to clear up). But, I loved the look of these side streets and when I saw that man walking towards me I knew I had to grab a couple of frames.

Now I do really like the mood of the fog that's created in this shot but there's just so much detail lost. Thinking it might be worth salvaging though, I played with the sliders in Lightroom a bit but just wasn't very happy with it. On a lark, I decided to see if it might work as a black and white so I swung over to Photoshop to use Nik Software's Silver Efex Pro. Playing with some of the presets, I found that they did pull out a lot more detail in the shot but I wasn't happy with losing all of the nice colour. I quickly realized though that this would be a perfect application for the technique I'd described in my Making Montreal posts. The fact that Vanelli had recently talked about using that technique as well may have played into it being in my mind. I found a preset that I liked and blended it using the luminosity blending mode and I was amazed with what I ended up with. I went back in and further tweaked things like brightening up the man's face a bit and playing with the structure sliders. I liked the look but found that I'd lost a bit of the glow to the highlights so I went into Color Efex and applied the glamor glow filter to bring but some of that look to the highlights. On the advice of Vanelli, I burned down the edges a bit and also corrected the slight tilt to the image. This is the final result:

What was most impressive about this was that I got to about 90% of the look in this image in probably less than 5 minutes of work thanks to Silver Efex Pro. By applying it as a smart filter I kept things in a non-destructive space and that allowed me to go back in to tweak things based on the feedback I got, and even allowed me to fix the rotation in camera raw. I think this shot really shows the power of the workflow I described in my Montreal posts. But more importantly, I think it also shows how important it is to not give up when you're faced with a problem but instead to work through the problem and just keep shooting. I could have easily written off my camera as useless until the fog cleared and if I'd done that I would have missed this opportunity. Instead, I shot through the problem and I ended up with a great happy accident.

How do your filters keep you from getting the shot? by Andrew Dacey

This past weekend I participated in Scott Kelby's Worldwide Photo Walk. We had pouring rain predicted for the entire weekend so the walk leader had come up with a rain plan to shoot in a local museum, The Maritime Museum of the Atlantic. I hadn't visited that museum in years so it was fun to walk through and look at all the nautical displays. I had fun shooting some abstract shots of a light house lens and also working with some detail shots of the displays. I tend to enjoy shooting abstracts so this was a lot of fun for me. I even tried some handheld HDR shots as the lighting was a little challenging in some situations.

However, other people in the group found the location to be more challenging and this made me think about how our own filters can really limit ourselves from getting the shot. One example of this was that one of the participants commented that he was having a tough time because he was trying to stay at 800 ISO on his camera because the noise wasn't great above that. Now I can't comment on the noise performance for his particular camera (a Nikon D5000) but this really stuck with me. Yes, maybe the noise does get worse above 800 on his camera, however it might also open up possibilities in the difficult lighting. I can't say for certain if he did pass on shots because of this but I did catch myself thinking that way from time to time. I was also trying to stick to around 800 as my "base ISO" in the shooting conditions and I did catch myself thinking at times that my shutter speed was going to be too low to handhold the shot. However, what I tried to do was to catch myself whenever I thought that way and would adjust my ISO. In some parts of the museum I had to go as high as 3200 and arguably could have gone higher. Now I shoot with a Nikon D700 which has incredible high ISO performance but the point is that I decided that getting the shot was more important than the noise. Are the 3200 shots noisier than the 800 shots? Absolutely, but I actually have a shot. I could have easily dismissed the possibility because I'd have to increase my ISO above what I considered "acceptable".

Since the walk I've thought a little more about this and applied it more broadly. Settings are one thing, but what about subjects or entire locations? How easy is it to dismiss a scene as not having anything worth shooting? Once you've put that filter up how likely is it that you won't find anything worth shooting? Even something did present itself would you catch it or would your filter keep you from seeing it?

Don't get me wrong, sometimes that filter is based on experience and a serious evaluation of the scene (conscious or unconscious). However, sometimes that experience can be a double-edged sword. Sometimes we just need to silence that internal critic saying that the shot won't work and be open to the possibility that there is something there. Will it always work? No, but sometimes by opening yourself up to the possibilities presented by a scene you can end up surprising yourself. I know I'm going to try to be more aware of my own filters and giving myself permission to experiment, even if it does mean I fail miserably.

Back in action by Andrew Dacey

Well the splint came off a few weeks ago and I think my recovery is doing quite well. My hand is still weak and stiff at times but overall I'm feeling pretty good and have been happy with my recovery. The one thing I am finding tough is getting back into the routine with some things after such a long break. Fortunately, I am building up a list of ideas I'd like to post on and I have some other new developments that I hope to share with my readers in the next few weeks.

More to come.

Slight hiatus by Andrew Dacey

Going to be taking a bit of a summer hiatus for the blog. I'm currently in the middle of renovations on my house and this last week I broke my hand which makes typing a lot slower. My recovery should take roughly 5 more weeks or so. I'm hoping to still get some posts out during that time but the posting frequency is definitely going to be reduced.

Thanks to all more readers, I hope to have more for you soon.

Getting a shot out of your head by Andrew Dacey

A bit of a random image this time. This is about a block from my house and a couple of weeks ago when I was on a walk I spotted the wall and the fire hydrant and I just knew I had to shoot it. It's kind of hard to explain but I could just so perfectly see this shot in my mind and I couldn't get it out. At first I went through all of the doubts about if it was even worth shooting and whether I should even bother with it. But, I just couldn't stop picturing it in my mind.

In the end I shot this if for no other reason than to get it out of my head. I got to a point where I knew I just had to get it out or it would keep bugging me. I knew that I had to shoot it and see if I could capture the scene as I'd visualized it. I took the mindset that even if the shot was a complete failure that I could at least try to learn from it.

In the end? I found the original shot a little flat but otherwise it was pretty much as I saw it in my mind. I knew I wanted to crop it wide to really simplify the shot and emphasize the repeating pattern in the wall. At first I thought I'd crop things a little tighter to cut off the bottom of the side-walk and the top of the wall but in the end I decided I liked it better with those included. The one thing I had really hoped to get was a person around the left side of the image. I was hoping to get a good amount of motion blur of the person so they were more of a shape rather than an identifiable person. In the end though it was just too bright to get that kind of a long exposure and I didn't have a neutral density filter to take down the shutter speed. I did take one shot with someone positioned where I had in mind but it just didn't work with their clothes and not being blurred so I went with this shot instead.

As mentioned, the original shot was a little bit flat so I decided to see where I could take it with some post processing. I'm worried that I may have taken this one a little too far and crossed over into the realm of effect for the sake of effect but I've sat with it a few days and am still pretty happy with it. In the end though this was really more about just taking the shot I needed to take. Now that I have it's out of my mind and I've been able to move onto other new ideas. Sometimes that's all an image needs to be.

Backyard BBQ by Andrew Dacey

2011-04-12_backyard-bbq_0020.jpg

Continuing with my experimenting with food photography I recently took my camera out while grilling some steaks on my Weber charcoal BBQ. All of the food is real, as is the fire. And in case anyone is wondering, I have no relationship with Weber or any charcoal companies. I do happen to think that Weber makes a pretty good grill though.

Again, I used my Tamron 90mm 2.5 macro lens for these shots. I really like getting in close and capturing details of the food and this lens is great for that. It is manual focus though but that's not as much of a drawback when shooting macro photography (or near macro in this case).

What proved to be a bit more of a challenge was using the camera handheld. I was really tired that night and almost didn't take my camera out to shoot the food as it was cooking. In the end though I decided to bite the bullet and try to get a few shots since I'd be out there anyway. But, this meant that I was being a little lazy and didn't take my tripod out. In some ways that was useful as it really allowed me to work quickly but I did also loose a lot of shots due to being slightly off in my focusing since the depth of field is so shallow when working this close.

All of this was shot with natural light, it was in the evening and the sun was starting to go down so I got fairly soft light as my main light. I also really like how the fire adds a nice underglow in a lot of the shots I selected here. I feel this really helps add to the feel. I ended up shooting in continuous low quite a bit for this shoot in order to increase my odds of capturing flames or sparks. I also think this helps improve your chances when shooting macro as slight shifts in movement while shooting can really throw off the focus and shooting continuously really helps improve your odds of getting a few shots that are sharp where you want them to be.

As I think I've mentioned before, it's really important to me to shoot real food and that food be eaten. I really don't approve of the idea of faking the food, especially in a way that makes it inedible. I understand that the goal is to get the best shot but I think the amount of waste just doesn't justify it. I really want to push the idea of "honest" or "real" food photography. Right now that poses some challenges for me though since I'm usually the one cooking the food too. This means that I have to work fast when shooting and also keep an eye on how the food is doing so I don't ruin it in the process (as it's likely to be my supper as well). That also explains why there haven't been any people in my food shots to date. I'd really like to shoot some photos of chefs working and I'm hoping that this practice will help get me ready for that kind of experience as well as give me a body of work to show when I approach someone with the idea.

Experiments in food photography: Coffee by Andrew Dacey

I've been very interested in getting into shooting food and cooking lately. I'm a little late in getting these up, but here's some early attempts from my own kitchen when brewing a cup of coffee in my french press.Overall, for a first effort I'm pretty happy with these. I shot these with my old Tamron 90mm 2.5 macro lens. The lens is an old manual focus Tamron adaptall lens. I used to enjoy using it on my old Olympus OM bodies and was very happy to give it a new life by getting the proper adaptall mount to mount it on my Nikon D700.

One of the things that's very important to me with food photography is that I don't want to waste any food in the process or shoot fake, or otherwise inedible food. Because of this, I had to work very quickly to get these shots while the coffee was brewing (less than 5 minutes) and while the coffee was still hot as I fully intended to drink it.

I tried to get some shots of the kettle while it was boiling the water but I wasn't happy with how the shots of the steam turned out so none of them made the final cut. All in all, a fun experiment and I really hope to shoot more in the future.

Preparing for success by Andrew Dacey

There's the old saying that success happens when preparation meets opportunity (quick Google search attributes this to Henry Hartman). I've been thinking a lot about that lately and both in the ways that I feel I'm doing well and where I'm falling flat. In terms of what I do well is on the technical side. I can be ready to shoot at the drop of a hat. Give me 5 minutes and my gear is ready to go. A lot of this is to do with how I operate after a shoot.

  1. I never really unpack my photo backpack. At most, I'll pull the body out of the bag but that's it. This means most of my gear is ready to go in seconds.
  2. After downloading all my pictures and ensuring that they're backed up to a 2nd location (crucial) I format all my memory cards, this means they're all ready to go again.
  3. I reset the camera to my standard settings if I've adjusted anything for a specific shoot (like using a high ISO)
  4. I recharge the batteries, even if they're not run down

Okay, all of this means that if someone were to call me right now with a shooting opportunity I could be good to go, great.

Now, in the interests of disclosure, let's look at where I fall down. This would mainly be on the business side of things. I've gotten better at preparing model releases before a shoot but there's a lot of other things I still let slide. Right off the bat, I don't have any business cards or a portfolio ready. This means if someone is interested in my photography I really have nothing ready to promote myself, not good.

Earlier this week I did have someone ask me if I had any cards on me and I had to tell them no. Fortunately, this was more for getting in touch with me relating to some shooting I've been doing for them for free so it's not the end of the world but it's not great either.

Tonight, there was an industry event going on at Aperture Studios. I ended up having a schedule conflict and couldn't go but I started realizing that I didn't have anything to bring to that event. Given that I haven't been very active in the local photo community this would have been a great opportunity to network but not having any materials to show doesn't exactly send a good first impression.

I'm not posting this to beat myself up but more to point out that there really is more to the photo business than just taking pictures. It is a business and needs to be run as such. More and more I'm feeling that taking good photos and being good on the technical side just gets you in the door, but it's how you operate as a businessperson that really determines how successful you are, and a lot of that can just come down to how much you prepare.

New Gallery: Newfoundland 2010 by Andrew Dacey

2010-07-04_nfld-2010_14-1.jpg

In early July my girlfriend and I visited her parents in western Newfoundland.

I was very prolific in my shooting, coming back with 373 images. I've finally managed to cut that down to a reasonably sized gallery.

I don't often get the opportunity to shoot much landscape photography and I'm really pleased with how these shots turned out.

I'm also experimenting with a new way of displaying the gallery, I'd be interested to hear how people feel the thumbnails with lightbox effect works compared to the thumbnails beneath the full-size image. One nice feature is the lightbox effect I'm using (Fancybox) seems to be handling automatic scaling pretty well (for me at least) so I'm thinking that may solve some of the scrolling problems I was seeing with earlier galleries and vertical shots. If this works out well it's fortunately a very easy change to adjust the other galleries.

Check out Newfoundland 2010 and let me know what you think.

We are live! by Andrew Dacey

Well, after nearly a year after I registered the domain I've finally gotten this site live. I spent a long time working out different options for designing the site and how much I was willing to do by myself. In the end, I took the advice of a friend of mine who recommended to quit trying to build it from scratch myself (or coding my own templates) and to use some 3rd party themes and plug-ins instead. The result? A week later and the site is live, lesson learned.

I'm hoping to get a good workflow for the site so that it's easy for me to keep the posts coming fairly frequently. So far it seems like I've hit on a pretty good combination that lets me update things relatively easily and even integrates in with Lightroom so I'm pretty happy.